So you opted out of getting the Christmas Advent House for 2016. Ok, we get it. Maybe it was a timing thing - maybe it was a money thing - maybe it was something else. But whatever it was - let's set all of that aside and finally make the leap and get that Full Mansion Kit and get your Advent House ready for next year.
Post Christmas Sale - 2016. The Christmas Advent House is now on sale for a Limited Time. Visit our website and take advantage of a great price right now and be ready for next year. Don't delay! Get this now and be ready!
Visit our website: http://www.AdventHousePlans.com, add your items to the shopping cart, and use the following coupon code to get an additional 10% off your entire order. Go ahead, then, and get the side windows addition. Add the super nice Real Brick too! Get the vinyl Keystone numbers! Your entire order will be 10% off.
Coupon code: post2016
Take advantage of this Post Christmas Sale and get your Christmas Advent House ordered today!
This is a limited time offer. Once expired no more coupon uses will be allowed.
Thursday, December 29, 2016
Thursday, November 17, 2016
New Video Series! Assembly Instructions
We're finally moving on our Assembly Instructions video series and have released the first introduction video. Check it out here:
https://youtu.be/VLSLakpMNl0
This video series will be provided as a set of instructions showing how to assemble the Full Mansion Kit available on our website. Each step of assembly will be explained and shown throughout the series and will provide you with everything you'll need to know on how to to get your own Christmas Advent House built and on display fast!
We're working to release the rest of the video series as quickly as we can so be sure to sign up for the channel, to keep an eye on what's to come and keep an eye on this blog for additional news and notices.
Feel free to comment on our YouTube video if you have questions or would like to see more information on the Christmas Advent House.
Saturday, November 12, 2016
Updated Illustrated Atrium Build
This Post is VERY old and has been superceeded. Please refer back to our newer posts on the assembly of the new Atrium kit.
Please refer to this blog post: http://adventhouseplans.blogspot.com/2016/10/updated-structure-and-framing.html for information on the individual parts and how the layout together. Specifically, look at the Atrium layout.
First, Put the Atrium back, top and bottom together. The back is Parts #43 & 44. The top is parts 47 & 48 and the bottom is parts 45 & 46. Use the tabs to align the parts and glue. Allow to dry.
The Back piece sits on top of the bottom frame, and the top frame sits on top of the back piece. Each should be centered on the others. Glue these three parts well.
** Keep in mind that it doesn't have to be pretty when it comes to the gluing. Note that these parts won't ever be seen when the Advent House is on display. Further, you can paint the structure to help cover some of the gluing blemishes.

(Back, Top, Bottom with vertical braces in place)

(Front Bottom Tab glued with vertical brace in place)
Once the Top, Bottom and Back are assembled, you can add the vertical braces. Make note in the pictures below that you want to place the vertical braces where the Atrium Faces do not have openings.
** One note regarding the vertical braces. When a vertical brace is in place, at the top of the brace, the vertical face, on the backside of the brace, should be flush with the back side of the top frame. It's hard to tell in these pictures, but aligning that vertical brace this way ensures the top and bottom atrium frames are parallel and will align the atrium faces properly.
The center/front vertical brace goes right in the middle. Place the front Atrium face where it will glue up (centered on the very front face), and center the vertical brace on the center of the Atrium Face. The goal here is to place the vertical braces so they do not block any light coming from within the Atrium.

(vertical brace next to horizontal brace)
We do the same thing on the ends of the Atrium frame. In the image below, you can see the side Atrium face in place (but not yet glued) and the vertical brace is (mostly) centered on the 'non-glass' area of the side atrium face.

(Side vertical brace glued in)

(FrontSide Vertical Brace aligned with Atrium Face)
And in the image below, you can see that the 2 end/corner vertical braces are glued in. By using the Atrium Faces as a references you can find the best place to glue in the vertical braces.

Once all the vertical braces are aligned and glued in - add a little more glue to the joints. Allow to dry, then it's time to glue on the Atrium Faces (assuming you have them painted and vellumed)
** ** Please be careful when gluing the Atrium Faces to the Atrium Frame. DO NOT - let CA glue run down the face of the Atrium 'glass'. There's no recovery from that. ** **
Please let us know if you have any questions about this process. We'll continue to work towards getting the Video series released to make it even easier to assemble.
Saturday, October 22, 2016
Updated Structure and Framing information
In an effort to make it easier and faster to have your own Christmas Advent House, we have invested a great deal of time developing faster and better methods for assembly on our Full Mansion Kit. These changes have the potential of saving many hours of work. Following is a list of images showing the new layouts of all of the 1/4" MDF Material that is included in the Full Mansion Kit, as well as their associated numbering. In general, you'll work through the numbered parts - starting with #1 (ie: 1, 2 &3 all go together, 4, 5 & 6 go together, etc)
This blog post will also work as simplified assembly instructions. We are working on a short video series that will go into more detail on the exact process of assembling everything in our Full Mansion Kit. Until then, you are welcome to use the following information.
Please note that most of the pieces are designed to go together only one way so as to avoid confusion. However, before you get too glue-happy, do a double and triple check to ensure everything is fitting properly. Once positive - go wild with the glue. (Just don't glue your fingers together)
And as a matter of reference, each of these pieces are either a top-down view, or a front view. When removing each part from the block in which it is contained, each piece is facing up. You may want to make note of this while cutting out all of the pieces.
So - The (simplifed) Assembly:
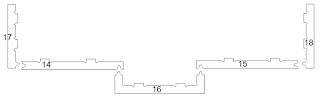
Start with these 3 pieces, glue together and they become the Floor:

Then, glue these pieces together and they become the Bottom Back. Attach to the back of the Floor - The tabs should align perfectly:

Next, DON'T GLUE THESE TOGETHER! These each glue to the floor in this order, and as the glue to the floor, glue to each other using the tabs system. These are the Walls:

DON'T GLUE THESE TOGETHER! Add these Soffits pieces in the order of the numbers shown. Apply to the Walls, and glue each soffit together at the available tabs.
Glue these 3 pieces together to make the Back Top, then fit to the top of the 2 end Walls. You may want to hold off on gluing this piece into place for a bit until the roof pieces all fit correctly)

Now build the Flat Roof by gluing these pieces together:

After the Flat Roof, glue the middle brace (#25) into the middle, and DRY FIT only the 2 smaller brace pieces. You'll glue the 2 smaller braces after the roof pieces are in place.
Time for the Angled Roof: Now it gets a little more challenging - you might want to ask someone for an extra set of hands since these parts don't have all the tabs like the rest of it. ** I also suggest a minor sanding/cutting adjustment to the top and bottom of these pieces, but I'll explain more about that in the coming video series.

While setting the angled roof pieces, you can get a little bit of help by carefully placing the Flat Roof piece in place. You'll notice the brace pieces will help prevent the angled roof pieces from falling backwards.
Now we're down to the Bases. These pieces go at the bottom of the walls, and cover the front edge of the floor pieces. These pieces represent the 'Concrete' that the walls are sitting on.

And finally - the Atrium:

You can see how the main atrium pieces (back, top and bottom) go together, and then the 7 vertical braces go between the top and bottom. Again - this will be explained more in the coming video series.
And that's all of the Structure pieces and where they go - except for the Corbels, which will also be explained a little later.
Keep an eye on this blog for updates about the video series so you can learn how fast and easy it is to build your own Mansion Style Advent House.
Questions? Please feel free to use the Contact form on our website: www.AdventHousePlans.com
This blog post will also work as simplified assembly instructions. We are working on a short video series that will go into more detail on the exact process of assembling everything in our Full Mansion Kit. Until then, you are welcome to use the following information.
Please note that most of the pieces are designed to go together only one way so as to avoid confusion. However, before you get too glue-happy, do a double and triple check to ensure everything is fitting properly. Once positive - go wild with the glue. (Just don't glue your fingers together)
And as a matter of reference, each of these pieces are either a top-down view, or a front view. When removing each part from the block in which it is contained, each piece is facing up. You may want to make note of this while cutting out all of the pieces.
So - The (simplifed) Assembly:
Start with these 3 pieces, glue together and they become the Floor:

Then, glue these pieces together and they become the Bottom Back. Attach to the back of the Floor - The tabs should align perfectly:
Next, DON'T GLUE THESE TOGETHER! These each glue to the floor in this order, and as the glue to the floor, glue to each other using the tabs system. These are the Walls:

DON'T GLUE THESE TOGETHER! Add these Soffits pieces in the order of the numbers shown. Apply to the Walls, and glue each soffit together at the available tabs.

Glue these 3 pieces together to make the Back Top, then fit to the top of the 2 end Walls. You may want to hold off on gluing this piece into place for a bit until the roof pieces all fit correctly)

Now build the Flat Roof by gluing these pieces together:

After the Flat Roof, glue the middle brace (#25) into the middle, and DRY FIT only the 2 smaller brace pieces. You'll glue the 2 smaller braces after the roof pieces are in place.
Time for the Angled Roof: Now it gets a little more challenging - you might want to ask someone for an extra set of hands since these parts don't have all the tabs like the rest of it. ** I also suggest a minor sanding/cutting adjustment to the top and bottom of these pieces, but I'll explain more about that in the coming video series.
While setting the angled roof pieces, you can get a little bit of help by carefully placing the Flat Roof piece in place. You'll notice the brace pieces will help prevent the angled roof pieces from falling backwards.
Now we're down to the Bases. These pieces go at the bottom of the walls, and cover the front edge of the floor pieces. These pieces represent the 'Concrete' that the walls are sitting on.

And finally - the Atrium:

You can see how the main atrium pieces (back, top and bottom) go together, and then the 7 vertical braces go between the top and bottom. Again - this will be explained more in the coming video series.
And that's all of the Structure pieces and where they go - except for the Corbels, which will also be explained a little later.
Keep an eye on this blog for updates about the video series so you can learn how fast and easy it is to build your own Mansion Style Advent House.
Questions? Please feel free to use the Contact form on our website: www.AdventHousePlans.com
Monday, January 11, 2016
POST CHRISTMAS SALE!

The Christmas Vacation Mansion Style Christmas Advent House Full Kit is ON SALE NOW for our Post-Christmas Sale. But it's only for a limited time.
Maybe you already have the full kit - maybe you have just the plans - maybe it's time to GET the Full Kit - maybe you can build another Advent House for a family or friend.
You can get the Full Kit right now for $100.00 off the current retail price of $599.99. Save yourself some big bucks by buying now and have all the time you need to get it built and ready for next Christmas. You won't see a better price on the Full Mansion Kit ever. The price will never be this low again. Take advantage of this Post Christmas Sale and Buy Now. Sale is for a limited time.
Go here: http://adventhouseplans.com/index.php?route=product/product&path=111&product_id=101, choose your options (We suggest the Plasti-formed Exterior Brick), and Buy Now!
Subscribe to:
Posts (Atom)