
These following steps show you how to assemble the new Structure.
KIT BLOCKS:

Like many other parts, the Structure is contained in pre-cut kit blocks. We suggest you keep the parts in their blocks until you need them.
CUT OUT PARTS:
START WITH THE FLOOR:
*** PLEASE NOTE: *** The 2 blue pieces shown in the image below are now CUT IN 2 individual pieces each instead of 1 long piece.


ASSEMBLE THE BACK WALL:
*** PLEASE NOTE: *** The 2 blue pieces shown in the image below are now CUT IN 2 individual pieces each instead of 1 long piece.


** NOTICE ** We have recently made some minor modifications to this back piece which modifies the next few steps. We are working on updating the instructions. If you have any questions, please Contact Us.
*** PLEASE NOTE: *** The 2 blue pieces shown in the image below are now CUT IN 2 individual pieces each instead of 1 long piece.


*** NOTE: *** Now Turn the back piece over so we are now looking at the side without any bracing. This side is the 'Outside' of the back wall.


ASSEMBLE THE FLAT ROOF:
The Flat roof gets assembled upside-down, so that, when installed to the structure, the braces will all be 'inside' the structure. This means in these pictures below, we are looking at the 'underside' of the flat roof.
 Start with the middle flat roof piece and add the 2 shorter braces and the 1 longer brace that align with the tab/slots pattern. It's wise to dryfit the parts before you start gluing.
 Now add the other 2 side pieces, aligning with the tabs/slots and the fingers on the ends of the parts.
 Then, when you flip it over, it looks like this. In this image above, we are now looking at the TOP of the flat roof. This is the orientation that we'll install it on the structure. Set aside for now.
 Add the following braces to the front center wall. Note that the inside corner braces at the bottom have a unique slot/tab pattern to ensure they go in the correct place. We suggest dryfitting all of these braces to ensure you have them all in the correct place, then come back and glue all of them into place.
 Add these braces to the larger wall, and repeat on the other large front wall as well. Make note of the 2 vertical bracing on these larger walls.
 Then add these braces to the end walls. And repeat on the other end wall. ** Do note that these images are showing the optional side windows cut out. If you are building your Advent House without these optional side windows, you will NOT want to cut them out.
The Flat roof gets assembled upside-down, so that, when installed to the structure, the braces will all be 'inside' the structure. This means in these pictures below, we are looking at the 'underside' of the flat roof.


ADD BRACING TO THE WALLS:
These braces are used to enhance the rigidity of the structure. You may choose to dry-fit many of these braces just to be sure they are all in the correct place.
These braces are used to enhance the rigidity of the structure. You may choose to dry-fit many of these braces just to be sure they are all in the correct place.


ASSEMBLE THE WALL SYSTEM:
 Start with the front center wall. Note that the lower braces are designed to 'interlock' to provide more strength in the structure. These interlocking braces will take a little extra encouragement to get these 2 wall pieces to get their tabs/slots aligned. Be careful not to break anything, though.
 And we add the other side of the front wall system.
 Now assemble these 2 walls. Same as the other one, encourage the bottom interlocking braces to play nicely.
Repeat with the walls for the other side.
 Now we add the side wall set to the center wall set. In this case, slip the locking 'hooks' through the slots and slip down to create a strong and secure connection.
 And we repeat on the other walls.
 And we add the back wall assembly as well. We now have a 'wall system', that will sit down on the floor assembly.
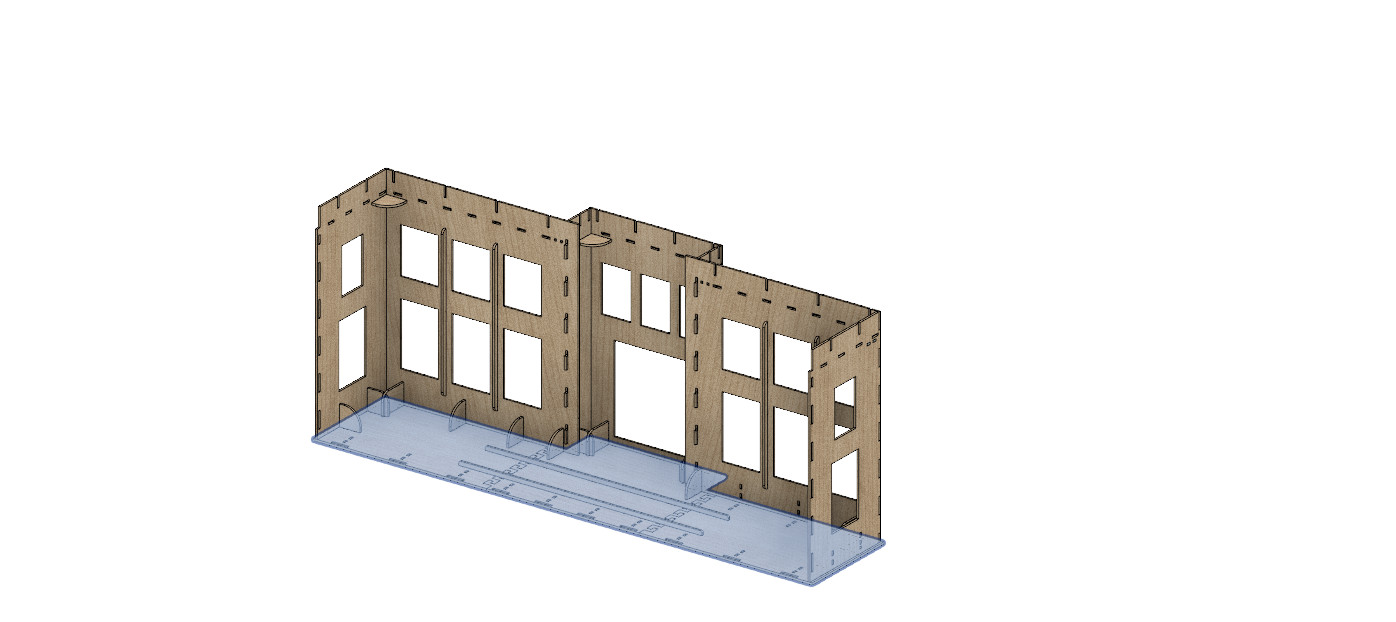
 This step will take a little work. Please note that in this image, the back wall is removed for the purpose of clarity. In reality, you'll be adding the entire wall set to the assembled floor system. You'll need to be patient and carefully work your way around the wall set, getting each of the tabs and slots to align and 'play nicely'. Be patient. Once they are all in (and set all the way in), you'll have a very strong wall system. There should be very little light coming through between the walls and the floor. (hopefully none) Once the walls and the floor are assembled, go to town with the glue to ensure they stay together.
 With the walls assembled and placed on the floor assembly, we can now add the soffits. You MUST do these in the correct order and we advise you to NOT glue these until you are sure of the assembly process.
Start with the side soffit. Slip the 'hooks' into the slots, then shift the soffit towards the back of the walls. This will lock the soffit into place.
 Then add this next soffit piece. Assemble just like the previous soffit. You'll note that once this one is installed, the previous one will NOT be able to be removed.
 Now repeat these steps (in the correct order) for the soffits on the other side.
 And finally, slide the center soffit in from the front, all the way back until the 2 small tabs on either end sit into the holes on the wall pieces.
 Start with the 6 shorter angled roof braces. Note that ALL of the roof braces angle INTO the structure so that the angled roof panels will lean IN. DO NOT GLUE these yet.
These 6 shorter angled roof pieces go on the outside corners.
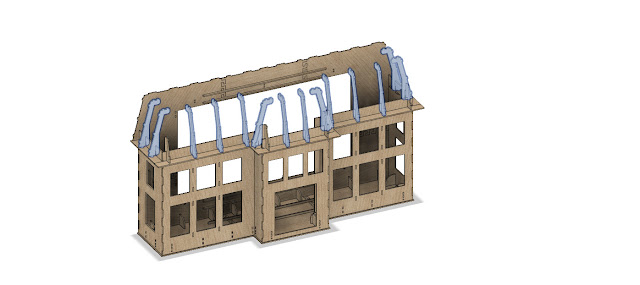 Now add the taller angled roof pieces. These go in all the other top slots on the wall pieces. Note that all of the angled roof braces must slip all the way down into their slots. DO NOT GLUE these yet.
 Next we start adding the angled roof panels. Start with the far side roof (on the far left of this image). Align all the tabs and slots and it should sit in there pretty clean. Then add the large front facing roof panel, then the small roof panel. Each should sit in their location with ease and be self supporting without glue yet.
DO NOT GLUE THESE YET!
 Repeat on the other side.
 Then add the front center roof panel.
 Now we add the flat roof assembly we created earlier. Be sure to have the braces on the flat roof assembly facing DOWN/INSIDE. This step can take a little work to get all of the tabs and slots to align properly. Take your time and work your way around the structure. You'll likely need to reach inside the structure to adjust the angled roof braces to get them to align. But once aligned, the top flat roof should sit on top nice and snug. Adding this flat roof assembly will also add a lot of rigidity to the structure.
Assuming everything went together as expected, you can now start adding glue to the roof system.
 Repeat on the other side, in the same order. Assuming these all sit in where they belong, feel free to glue up well.
 *** NOTE *** Before you glue on this front base piece, you'll note there are 2 different pieces that fit here. One of them has a wider opening for the door. The other has a narrower opening for the door. If you plan on using a formed exterior (such as our plasti-formed brick or our Real Clay brick), then you'll want to use the base with the narrower opening. (Because the door trim will sit OVER the base piece) If you are using a flat exterior finish (like pressed paper or even just a texture and paint), you'll want to use the base with the wider opening (Because the door trim will sit INSIDE the base piece). Test both pieces, with consideration of your exterior finish, before gluing this piece in place.
 Add the back door assembly we created earlier. This is designed to slip up under the top door brackets, then slip down into the bottom door brackets. The vertical braces help to align the door and keep it centered on the structure and helps prevent leaking light, once the Advent House is fully assembled and lit from within.


Repeat with the walls for the other side.


ADD THE SOFFITS:

Start with the side soffit. Slip the 'hooks' into the slots, then shift the soffit towards the back of the walls. This will lock the soffit into place.


ADD THE ANGLED ROOF BRACES:

These 6 shorter angled roof pieces go on the outside corners.


DO NOT GLUE THESE YET!


Assuming everything went together as expected, you can now start adding glue to the roof system.
ADD THE BOTTOM BRACES:
 These bottom base pieces sit on top of the small lip of the floor assembly. Start with the largest front facing piece and be sure to shift it to the right, against the front wall bump out. Then add the larger side piece (on the left in the image above), shifting it forward against the first piece you added. The backside of this base piece should be flush with the back wall. Then add the short piece, which should be flush with the front of the front wall.


FINAL STEP:

Finish up the structure by adding all of the exterior finishes. After you have assembled all of the other parts of the model, you can then begin final assembly and put it all together!
Questions? Please feel free to contact us on our website or our etsy store!