NOTICE: With the new Door and Window designs, this gluing jig is no longer needed.
This post has been superseded.
RIGHT HERE!
Start with the Gluing Jig to make the window and door assembly a breeze!
These following steps show you how to assemble the Gluing Jig.
THE BLOCK:
This is how we start. This is the Gluing Jig Block. This block doesn't really have a front and a back. Pop out all the pieces and prepare to assemble. You'll want some gap filling CA Glue and a nice hard working surface that you don't messing up by getting some glue on it.
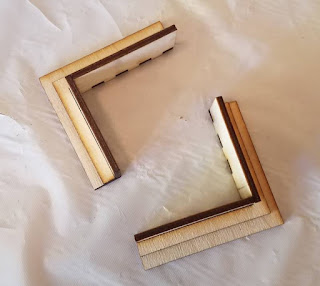
There are 2 jigs in the kit (one for each corner). There are 4 pieces per jig (one set on the left and one set on the right of this image)
BEGIN ASSEMBLY:
Once all the parts are separated (and the tabs cleaned up if you want), We begin assembly. You'll want to dryfit parts together before we break out the CA Glue.
DRYFITTING:
This jig has been designed to go together in only one way. We have tabs for all the parts except for the smaller "L" Shape piece. Note that the ends of each piece are flush with the others. Once you have the orientation correct, proceed. Do not glue if you are unsure of the orientation! Contact us if you can't figure this out - we're happy to help!
The 4th part is the smaller "L" shape and that will be applied during gluing. (it doesn't really require dryfitting)
START GLUING:
Make note of the locations that will be in contact during assembly and apply Gap Filling CA Glue to those areas
Make sure you get glue on the inside edges as well
Once you have glue where you need it, begin assembly of glued parts
GLUE UP:
Using the "L" Shaped parts of the 2nd jig, press into the inside corner of the jig you are gluing to hold a nice tight (and square) inside corner.
In this picture above, you can also see the smaller "L" Shape piece is being glued on the backside of the glued jig to help hold it square and true.
Using the "L" Shaped parts of the 2nd jig, press into the inside corner of the jig you are gluing to hold a nice tight (and square) inside corner.
In this picture above, you can also see the smaller "L" Shape piece is being glued on the backside of the glued jig to help hold it square and true.
ASSEMBLED:
This is one of the finished Gluing Jigs, all glued up and ready to assist you in putting together the door and windows fast and easy.
REINFORCE:
Last step is to reinforce all the joints by adding some additional CA Glue to all the seams. Allow the CA glue to penetrate just a bit and the jig will never come apart!
Allow to dry/cure fully!
NOW REPEAT:
Once the one jig is glued up, you can now repeat with the other jig, using the back of the already glued up one as a brace to ensure the second jig is square and true like the first one.
FINISHED!
And the Jigs are complete! See how simple that was! And now these jigs will be used to square up and even out the frames for the door and all of the windows. Ensure the parts
NEXT STEP:
Once the jigs are complete - move on to assembling the windows.
Once the jigs are complete - move on to assembling the windows.
Or you can assemble the Door.
Questions? Please feel free to contact us on our website!


