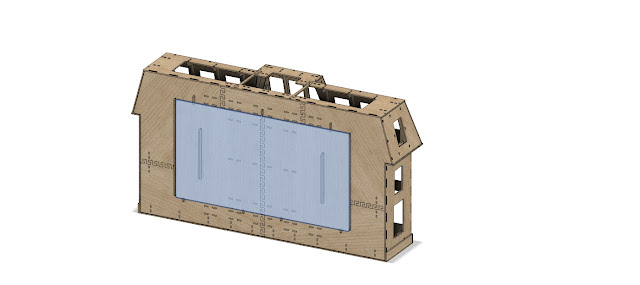
START HERE!
Always start with this link to see the Order of Operations for the Mansion Style Advent House. That is where you'll have access to links to all of the most current instructions.

Friday, November 10, 2023

What else might you want?

The Christmas Advent House Kit contains everything you need to build the main structure of the Advent House.  However, due to shipping constraints and customer preferences, there are some things we do not provide.  The following is a list of additional items you may want and/or need to complete your Advent House.  These are Amazon Affiliate links.


ASSEMBLY:

  • Exacto Knife No 1 : To assemble the Advent House, you'll need a good sharp knife.  Start with this simple knife, or...
  • Exacto Knife Set : Upgrade to a knife kit for more working options.
  • CA Glue Extra Thick :To glue the kit together, we use CA Glue.  This bottle works well and comes with a small tip.
  • CA Glue Extra Thick Refill : And you'll probably need more than just that small bottle, so pick up an extra bottle of glue.

FINISH PREP:

  • Wood Putty Kit : Once the structure is glued together and dry, you'll need to putty all the tabs and slots and corners and edges.
  • Sanding Blocks : And when the putty is all dry, you'll need to sand.  We use several different grits and prefer using foam blocks like these.
  • Painters Tape : After sanding, you'll start painting, but you must tape off areas you don't want painted.  The wider the tape the better to cover more area.
  • Clay Brick Cutters: If you purchase the Real Clay Brick option, you'll use these to cut the individual bricks (for around the door and the windows).  The plastic brick is cut with a scroll saw.

PAINTING:
Then the painting starts.  The following are the types of finishes that we use:

  • Flat Gray Primer: For the bases and then also a light coat on the windows and door and atrium/tower before painting those parts for a clean smooth finish.
  • Matte Black Primer: For the flat roof and the backside (and the outside of the back door).
  • Glossy White: (Optional) You can add this to the interior of the Advent House, and inside of the back door to aid in the reflection of light out the windows, atrium, tower and front door.
  • Gray Stone Texture: We use this on the bases and the roof for texture.  The bases we leave with just the stone texture (we think it adds a nice 'concrete' look), the roof we'll add green paint overtop the texture, giving it an asphalt shingle-like texture.
Then add the final color(s).  Of course you get to choose your own colors, but there are the ones we use:
  • Semi-gloss Hunter Green: For the Angled Roof pieces.
  • Shiny Gold: For the Window Keystones, and the Tower Spire - and anywhere else you want to add some gold. 
  • Glitter Blast Diamond Dust : To add additional sparkle to the gold, or anywhere else, we like this diamond dust spray.
  • Matte Clear: Once everything is dry, we use this to protect the paint, especially on the textured areas.  We prefer matte to reduce the 'glossiness' of the finished product.
OTHER ITEMS:
  • Clear E6000 Glue : If you are adding the brick exteriors, you can use the same CA Glue to attach the brick, or you can use this clear E6000 glue.  We use clear so it's less noticeable if it oozes out anywhere. We also find the E6000 to be a little more forgiving when gluing all the brick into place.
  • Black E6000 Glue : When attaching the windows to the structure, you can use CA glue, but we like this black E6000.  Not only does it give you a little more time to ensure everything is where it belongs before it set up, it also helps block light escaping from between the frames and walls/roofs.
  • Inkjet Friendly Vellum : If you didn't purchase the preprinted window images, you'll also probably want to get some Vellum for printing your own images for behind the door and the windows.  We use inkjet friendly Vellum. We use the same CA Glue from above to attach the vellum to the parts.

DECORATION:

Finally, once it is all put together, you may want to add some decorations during setup, such as: 

And there are many other exterior decorations you can add to make this a unique-to-you Christmas Decoration.


Are there other things you find helpful in this build?  Let us know!

Tuesday, July 12, 2022

LED Lighting Kit

 If you have purchased the LED lighting kit we provide, the following image shows the layout required to get them to work properly.


** Click on the image to see the full size version for clarity **


The LED strips are attached to the inside face of the back wall of the structure.
Make note of the orientation of the LED strips and the RGB requirements to ensure the lights work as expected.
DO NOT GLUE in place until all connections have been made and testing has been completed!
When attaching to the structure, keep the lights ON so you can see if you have any fail points during install (instead of AFTER) install.
The sticky on the back of the LED strips will only hold so long, so we suggest using tiny spots of CA glue to ensure the strips stay in place for years to come.


New Atrium Instructions

 The following is the updated instructions for the latest version of the Atirum Kit.  If you purchased your Advent House Kit after 2022.07.01 then you will use these instructions to assemble the atrium.


Instructions for the assembly of the Atrium


Introduction:

The atrium comes in several blocks of pre-cut parts.  Each part will need to be punched out of the block when it is needed.  To be certain of no broken parts, we suggest using an exacto knife to partially cut each of the tabs of each of the parts, front and back while in their blocks.  After the part is punched out, use the exacto knife and some light sandpaper to clean up each of the cut-out tab locations to be smooth.

The atrium goes together following a numbering system.  The atrium will require gluing and we suggest using the same CA Glue (Super Glue) as used in other parts of the kit.  BUT DO NOT GLUE until told to do so!  We suggest you do not punch out the parts from their blocks until each are needed per these instructions.  This helps avoid pieces getting lost. 

There are just a few “XTRA” pieces, just in case something gets dropped, lost or broken.  Be careful during punch out and during assembly, and you hopefully won’t need any of those extra parts.

NOTE:  All sub assemblies will have the etching facing INTO the atrium.  However, the 7 most visible pieces will also be covered with the Atrium Faces.

So let’s get started!


THE BACK Assembly: 

  •          Start with a good solid surface that you don’t mind scratching up or getting glue on. 
  •          Start with parts 01 and 02 (the back pieces of the atrium), laid down on the work surface with etching/numbers facing UP and interlock their matching fingers. The ‘narrower’ part of the back will be the TOP of the atrium.
  •          Use braces 03 and 04 to hold the back pieces together.  Press the braces parts 03 and 04 down into the parts 01 and 02 in their noted slots.
  •          ** NOTE **  These braces WILL NOT go all the way through the back piece YET since the tab system pushes THROUGH the back pieces and will extrude a tiny amount once fully set in place.  Once you have the braces pushed down into the back piece as far as they will go, flip the assembly over (so the etching is facing DOWN now) and press the two back pieces down and over the tabs of braces 03 and 04.
  •          Turn the assembly back etching face up and add glue to those 8 tabs that went through parts 01 and 02, just to keep it stable.  You’ll be able to add more glue later.
  •          SET ASIDE to dry fully.


The Bottom Assembly: 

  •          Lay out parts 08 and 09, as well as part 08C, with the etching FACE UP and interlock the small tabs at each point for alignment.
  •          The FRONT of the atrium will be the bump out.  The long straight edge will eventually attach to the Back Assembly.
  •          Use braces 10 and 11 on the front portion of the bottom layout.  Press the 2 braces together and press down into the noted slots.  The double thickness of parts 10 and 11 together provide additional gluing surface for the Atrium Faces in a later step.  Press the braces down firmly into the bottom assembly.
  •          NOTE: Unlike with the Back Assembly, these braces WILL sit flush to the bottom assembly parts as the tabs DO NOT push THROUGH the flat bottom assembly.
  •          Insert brace 12 on the back area of the bottom assembly.
  •          Add braces 29, 30, 31 and 32 in their noted slots as well.
  •          Add some glue to these braces to stabilize.  We’ll add more glue later.
  •          You’ll also want to add some glue between parts 10 and 11 and hold them together until they are set to make them a ‘single part’.
  •          SET ASIDE to dry fully.


The TOP Assembly: 

  •          Lay out parts 05 and 06, as well as part 05C with the etching FACE UP and interlock the alignment tabs.
  •          Use brace 07 in the noted slots.  Press firmly until fully seated on the Top Assembly.
  •          Add glue to this brace.
  •          **** BE CAREFUL with this assembly for now since it only has a single brace on it for now.
  •          SET ASIDE to dry fully.


Back Braces: 

  •          Once the Back Assembly is fully dry, lay it down again with etching FACE UP. 
  •          Add the small braces: Numbers 17-28 to each of their noted slot locations.  Ensure each number aligns with its numbered slot.
  •          *** NOTE: Just like the previous ‘back’ braces, each brace will only press in part way.  Leave it that way for now.
  •          Next add braces 13, 14, 15 and 16.  ** STILL FROM THE ETCHED FACE SIDE **  Press the braces as far as they will go through the Back Assembly.
  •          Once each brace is in its correct spot and pressed as far as it will go for now, carefully/gently lift the Back Assembly and press each of the braces fully into the Back Assembly so that the brace tabs protrude THROUGH the back assembly.  Ensure each of the braces are fully seated and flush with the etched side of the back assembly.
  •          Once you are sure ALL of the braces are in their correct locations, as well as fully seated, add a small amount of glue to each of the small braces to hold them in place.  You’ll be able to add more glue later.
  •          Allow to dry fully.


BACK TO TOP Assembly: 

  •          Once the Back Assembly, with all of its braces, are fully dry we can now start with final assembly of the Atrium Structure.
  •          Lay the Top Assembly on the work surface with the etching FACE UP, with the ‘bump out’ facing away from you.
  •          Next, set the Back Assembly on the work surface between you and the Top Assembly, with the etching FACE UP and with the smaller/narrower edge (the top) facing AWAY from you.
  •          Align the small braces on the Back Assembly, as well as the zipper tabs across the top of the Back Assembly with the holes and zipper tabs of the Top Assembly. 
  •          ** MAKE NOTE ** there are 4 tabs on the top of the Back Assembly that will not allow the Back Assembly zipper tabs to push fully down into the zipper tabs on the Top Assembly until a future step. **
  •          Now tip up the Back Assembly, set on end on top of the Top Assembly zipper tabs, align each of the braces with their slots/holes, and carefully press the tabs together in a ‘zipper’ motion, working your way across the top of the Back Assembly.
  •          Once many/most of the tabs are holding, gently pick up the assembly and work the tabs fully into position so there is very little light coming through the ‘zipper’.  Be gentle and it should hold pretty well for now.
  •          ** NO GLUE YET **


BACK/TOP TO Bottom Assembly: 

  •          Lay the Back/Top assembly on the work surface, with the Back Assembly etching FACE UP and the Top Assembly vertical with the Zipper tabs of the Back Assembly closer to you.
  •          Lay the Bottom Assembly on the work surface between you and the Back/Top Assembly with the etching FACE UP and the ‘bump out’ TOWARDS you.
  •          Align the zipper tabs along the long edge of the Back and Bottom Assemblies.
  •          ** MAKE NOTE ** there are 4 tabs on the bottom of the Back Assembly that will not allow the Back Assembly zipper tabs to push fully down into the zipper tabs on the Bottom Assembly until a future step. **
  •          Tip up the Back/Top Assembly and set on end on top of the Bottom Assembly and carefully align the braces parts 16 and 17 with the holes/slots available on the front side of the Bottom Assembly.  These won’t hold tight but will help with initial alignment.  ** DO NOT GLUE THESE YET **
  •          While holding braces 16 and 17 in place with the Bottom Assembly, align each of the tabs that are attached to the Back Assembly with their matching slots/holes in the Bottom Assembly. 
  •          Now gently lift the whole assembly off the work surface (the tabs won’t allow it to sit flush on the work surface anymore) and CAREFULLY press the zipper tabs at the bottom of the Back Assembly down into their matching zipper tabs on the back of the Bottom Assembly ALL WHILE aligning each of the braces to slip into their respective locations.
  •          *** NOTE – this process will take a little time and patience.  Be patient and gentle and work your way across the zipper and braces, slowly working each tab and brace into place.  Ensure Parts 16 and 17 are pressed into place as well.
  •          Once you have the tabs and braces all aligned, finish pressing the zipper tabs together very tightly so very little light can get through the seam.
  •          The assembly should be fairly stable but continue to be gentle while handling. 
  •          Assuming all the tabs went in the right places and all the zipper tabs aligned and are tight ….
  •          NOW GLUE!  Add glue to all of the braces/slots/holes, as well as all of the zipper tabs.  Add glue from both sides of each of the sub assembly connection points.
  •          Continue to press the zipper seams together (without gluing your fingers together or to the assembly).
  •          Add additional glue to all tabs, inside and out of the Bottom, Back and Top Assemblies.
  •          ** SET ASIDE and allow to dry fully before moving to the next steps.


Final Structure Assembly: 

  •          After allowing the current structure to fully dry, we can now add the final braces and do the final gluing.
  •          Each of the vertical braces has a mirrored part, as noted in the numbering system shown on the Bottom Assembly. 
  •          These angled braces will be the gluing surface for the Atrium Faces in a future step.
  •          Begin with parts 33 and 34.  Align them with each other, then press the bottom flange down into the noted location in the Bottom Assembly.
  •          Then CAREFULLY lift the Top Assembly in that location *JUST ENOUGH* to slip the top of the braces 33 and 34 into their respective slot in the Top Assembly.
  •          Carefully repeat this process with parts 35&36, 37&38 and 39&40.
  •          ** DO NOT GLUE YET **
  •          ** NOTE:  You DO have the option of gluing each of the pairs into their respective locations prior to adding the next set of pairs, but if you do, please allow the time needed to ensure the glue is fully dry on the current pair of vertical braces before you try to gently lift the Top Assembly to slip the next pair into their slots.  Otherwise, you may break loose that first gluing pair and then you’ll start creating something of a mess with the ‘not-quite-dry’ glue.
  •          ** NOTE: These vertical braces can be a little finicky (if not glued right away) and they may try to fall out of position with handling of the structure.  You may choose to use a simple lightweight clamp to hold them, or maybe even tie a string around them or use some simple scotch tape until you get the rest of the vertical braces into place.
  •          ** NOTE:  You may choose to glue each of the vertical braces pairs to each other prior to placing in the full assembly.  If you do this, BE SURE they are aligned perfectly while gluing them together.
  •          Next, move over to parts 50&49, then 48&47, 46&45 and 44&43, placing each pair in their noted locations, both on the Bottom Assembly as well as slipped up into the Top Assembly.
  •          Once all of the pairs except 41&42 are in place, NOW GLUE!  You can now glue each of these braces but be sure to hold the seams together tight for each one. 
  •          Lastly, once all of the other braces are in place, tight and glued well, add the vertical braces parts 41&42 at the very front center position, carefully slipping up into the Top Assembly.
  •          GLUE WELL – while holding the seams tight.


Now go back and add any additional glue you would like at this point. 

Ensure each joint, tab, slot etc has been glued well. 

Set aside to fully dry. 

** NOTE: Only the backside of the Back Assembly will be visible on the finished model. All of the other areas will be covered by the Atrium Faces.  So you may choose to paint that backside of the Back Assembly at this point.

You may also choose to add some white/shiny paint to the inside of the Atrium structure to help with reflecting the lighting as well.  This step is optional.


Atrium Faces: 

  •          While allowing the structure to fully dry, we’ll now prep the Atrium Faces before they get assembled to the structure.
  •          There are 10 Atrium Face pieces.  Each needs to be punched out of their blocks, lightly sanded and then painted on one side.  The following image shows how the faces should be laid out for painting.


Atrium Faces Layout Image 

  •          Lay out all of the Atrium Face pieces as shown in that image, then add paint. 
  •          ** NOTE: You’ll want to ensure you get paint on all of the edges as well since some of them will be visible on the finished Atrium.
  •          Once painted, allow to DRY FULLY.


  •          Once the paint is fully dry, we then add Vellum to the UNPAINTED side of the Atrium Face pieces.
  •          Layout out all of the Atrium Face pieces PAINT DOWN.
  •          ***** NOTE ******  DO NOT Cut out the ‘inside’ areas of the Atrium Vellum pieces.
  •          Cut out ONLY the outside perimeter of each of the Vellum Atrium Faces with a little spare material all around.
  •          Overlay the matching Vellum to the matching Atrium Face pieces.
  •          Once each of the Vellum pieces is aligned with its correct Atrium face, carefully add a little CA Glue to the Atrium face. You don’t need much.
  •          *** NOTE – you want to keep the CA glue AWAY from the inside openings so the CA glue doesn’t push out into those openings or it will be visible on the finished Atrium.
  •          *** NOTE – DO NOT SLIDE the vellum around when placing on the Atrium faces.  You DO NOT want to get any CA glue inside of any of the opening areas.
  •          Simply gently and carefully lay the vellum down on top of the CA glue on the atrium faces.
  •          Add a little pressure down on the vellum to ensure it adheres well to the Atrium faces.
  •          Repeat for all of the Atrium faces.
  •          Allow to dry fully.

         Once the vellum and Atrium faces are fully dry, you will now come back and trim off the excess vellum from around the Atrium Face pieces.  Take about 1/8” off the outside edges of each of the Atrium faces so you can’t see the vellum from the front or sides of the faces..

         The last Vellum cut is the oddly squareish shape on the small rectangular Atrium face, as shown here: 


Final Assembly: 

  •          And now we finally do full assembly of the Atrium and finish it up.
  •          ** NOTE – You may want to do a dry ‘fit up’ on all these faces before adding glue.  Take the time to ensure each one is in the right place and fits as expected.
  •          ** NOTE – when gluing these faces in – DO NOT allow the glue to get out into the open window areas or the glue will be visible on the finished Atrium
  •          ** NOTE – Add glue to the vertical braces and across the bottom first.  Then, once assembled, you can come back and add additional glue across the inside edge of the tops of each of the angled faces.
  •          Start with the 2 larger rectangular faces and place on top of the Atrium, with the vellum FACE IN/DOWN to the structure.  The 4 tabs across the back of the Back Assembly will assist in aligning those 2 pieces correctly.
  •          ** DO NOT GLUE YET **
  •          Next add the smaller rectangle piece between the 2 larger ones.  Again, use the 2 tabs on the backside for alignment.  Once all 3 pieces are perfectly aligned and centered on the top of the atrium.  Carefully glue into place.
  •          ** NOTE - DO NOT allow glue to get out into the open window areas or it will be visible when finished.  It doesn’t take much CA glue, just enough to get it to hold.
  •          Next add the 2 smaller side faces, as shown below, to each far end of the structure.
  •          Use the 2 slots on each of the Atrium Faces and align with the 2 tabs on the side edge of the Back Assembly to align these 2 parts. 
  •          **NOTE – Ensure the Vellum is facing IN!
  •          **NOTE – Some light trimming may be required on the top (the short edge) of these faces to fit underneath the top faces.
  •          Next you add the 2 long parallelogram faces to the long front faces.
  •          With the Vellum FACE IN – slip the face up under the top faces and align with the 2 shorter side faces.
  •          **NOTE – due to the angles, there WILL be small gaps at these connection points. 
  •          And then the 2 tiny parallelogram faces go on the sides of the bump outs. (see below)

  •          And lastly, the front center face goes on.


AND THAT’S IT!  The Atrium is now complete and ready for display.  Once the Tower is complete, you’ll set it down into that one small square area you cut out of the center of the top of the Atrium.


Tuesday, November 24, 2020

Up-To-Date Structure Assembly Instructions!

We have recently completed a redesign of the Advent House Structure and made it even easier and faster to assemble.   Follow the steps below for easy assembly and a strong structure.


The finished structure.


These following steps show you how to assemble the new Structure.


KIT BLOCKS:

Like many other parts, the Structure is contained in pre-cut kit blocks.  We suggest you keep the parts in their blocks until you need them.


CUT OUT PARTS:

Most of these parts should pop out of their blocks fairly easy.  However, for those that are being a little stubborn, turn the block face-down and cut as far through the tabs as possible.  Since this is plywood, there may be some places where the laser has not cut all the way through.  Take your time to finish cutting through those areas with an exacto knife.  Lastly, clean up the location of each of the tabs with the knife or light sandpaper, just to be sure the parts assemble with ease.


START WITH THE FLOOR:


Start with the middle floor piece and the 4 braces that fit the slot pattern.  Glue the Braces onto this middle floor part.  We assemble the floor 'face up' so that the braces will be 'inside' the structure.

Then add the 2 side bottom pieces.  Align the tabs/slots with the braces and the fingers on the middle piece.  Feel free to glue up.  Set aside.


ASSEMBLE THE BACK WALL:


Start with the middle top back piece and the 2 horizontal braces that line up with the slot pattern.  We'll assemble this back wall to have most of the braces on the 'inside' of the structure.  In these first images, we are looking at the inside of the back wall.  You'll note below what parts do NOT face inward.

Then add the 2 other top back pieces that align with the tabs/slots and fingers.

Then we take the bottom left back piece and add the 4 horizontal braces that align with the tab/slot pattern.

Then add the other side of the bottom back pieces.

Now combine the 2 back wall pieces and add the 2 shorter vertical braces, as well as the wall-to-floor braces.  All of the bracing to this point is 'Inside' the structure and will not be seen.

*** NOTE: *** Now Turn the back piece over so we are now looking at the side without any bracing.  This side is the 'Outside' of the back wall.

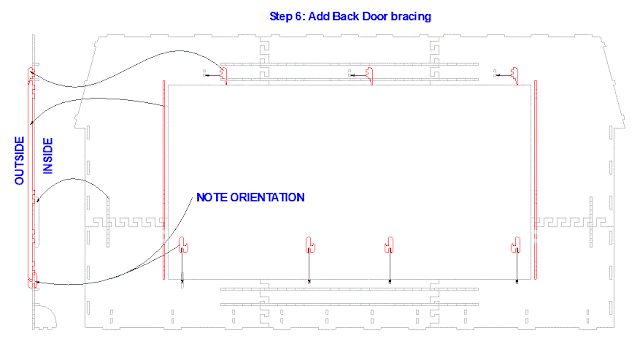
And add the 2 taller vertical braces, as well as the back door brackets.  *** NOTE THE ORIENTATION Before Gluing ***


*** NOTE: *** Now Turn the back piece over AGAIN so we are now looking at the INTERIOR. 


Make note on the bottom braces, they need to be aligned like this.  DO NOT GLUE the bottom brackets right now.  We'll finalize these brackets later.  These brackets go on the INSIDE of the structure.

Set Aside


ASSEMBLE THE "BACK DOOR":

The Back Door gets assembled with the handles on the outside.
We assemble the back door 'Face Down' so that these first 3 braces are on the INSIDE of the door.

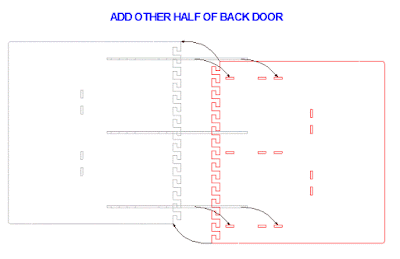
Add the other half of the back door, aligning the tabs and slots.

Now with the back door FACE UP, we add the "Handles".  These handles will be visible from the OUTSIDE (Exterior) of the door and will be used for removing the door from the structure.
*** NOTE THE ORIENTATION *** Of these handles. 

Set Aside


ASSEMBLE THE FLAT ROOF:


The Flat roof gets assembled upside-down, so that, when installed to the structure, the braces will all be 'inside' the structure.  This means in these pictures below, we are looking at the 'underside' of the flat roof.

Start with the middle flat roof piece and add the 2 shorter braces and the 1 longer brace that align with the tab/slots pattern.  It's wise to dryfit the parts before you start gluing.

Now add the other 2 side pieces, aligning with the tabs/slots and the fingers on the ends of the parts.


Set aside.


ADD BRACING TO THE WALLS:


These braces are used to enhance the rigidity of the structure.  You may choose to dry-fit many of these braces just to be sure they are all in the correct place.  


Add the following braces to the front walls.  Note that the inside corner braces at the bottom have a unique slot/tab pattern to ensure they go in the correct place. We suggest dryfitting all of these braces to ensure you have them all in the correct place, then come back and glue all of them into place.


Add these braces to the larger wall and the side walls, and repeat on the other walls as well.  Make note of the 2 vertical bracing on these larger walls.


ASSEMBLE THE WALL SYSTEM:


Start with the front center wall.  Note that the lower braces are designed to 'interlock' to provide more strength in the structure.  These interlocking braces will take a little extra encouragement to get these 2 wall pieces to get their tabs/slots aligned.  Be careful not to break anything, though.

And we add the other side of the front wall system then assemble these 2 walls.  Same as the other one, encourage the bottom interlocking braces to play nicely.

Repeat with the walls for the other side.

Now we add the side wall set to the center wall set.  In this case, slip the locking 'hooks' through the slots and slip down to create a strong and secure connection.

This is what one side will look like once connected together.


And we repeat on the other walls.


And we add the back wall assembly as well.  We now have a 'wall system', that will sit down on the floor assembly. (Image above is slightly exploded for clarity)

Then we add the wall set to the floor.  First, make note the the floor is FACE UP, with the 4 cross braces facing up (on the inside of the structure)  This next step will take a little work.  You'll need to be patient and carefully work your way around the wall set, getting each of the tabs to align and 'play nicely' and sit in their correct slot.  Be patient.  Once they are all in (and set all the way in), you'll have a very strong wall system.  There should be very little light coming through between the walls and the floor. (hopefully none)  Once the walls and the floor are assembled, go to town with the glue to ensure they stay together.


ADD THE SOFFITS:

With the walls assembled and placed on the floor assembly, we can now add the soffits.  You MUST do these in the correct order and we advise you to NOT glue these until you are sure of the assembly process.

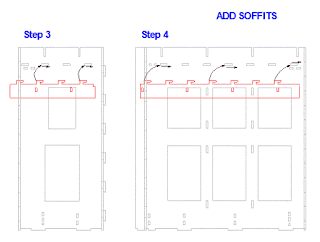
Start with the side soffit.  Slip the 'hooks' into the slots, then shift the soffit towards the back of the walls.  This will lock the soffit into place.
Then add the next soffit piece.  Assemble just like the previous soffit.  You'll note that once this one is installed, the previous one will NOT be able to be removed.

Now repeat these steps (in the correct order) for the soffits on the other side.

And finally, slide the center soffit in from the front, all the way back until the 2 small tabs on either end sit into the holes on the wall pieces.

Below is a summary of the steps to install the soffits.  Once you understand the process and are sure everything fits as it should, feel free to add glue.
** When Gluing these, ensure they stick 'straight out' from the structure.  You don't want them 'leaning' up or down.


These soffit pieces are designed to add even more rigidity to the structure by locking things in place.


ADD THE ANGLED ROOF BRACES:

Adding the angled roof braces takes a little extra forethought.  DO NOT GLUE anything until you are certain everything is in place as shown.  ALL of the angled roof braces lean 'IN' to the structure.  These are the braces the roof faces will sit on.  Make careful note of the location of the few smaller angled roof braces.

Start with the angled roof braces on the front wall bump out.  Note the shorter braces MUST go in the locations shown.  DO NOT GLUE these yet.

Now add the angled roof pieces on the larger front walls.  These go in all the top slots on the wall pieces.  Note that all of the angled roof braces must slip all the way down into their slots.  DO NOT GLUE these yet.


And now add the last few angled roof braces to the 2 side walls.
** NOTE ** All of the taller angled roof braces should be at the same height, so take a moment to ensure they are all sitting down in their slots as designed.
Each angled roof brace sits on top of (or inserts into) the soffits.


This image above shows a summary of the locations of the angled roof braces.

DO NOT GLUE THESE BRACES YET!


ADD THE ROOF FACES:

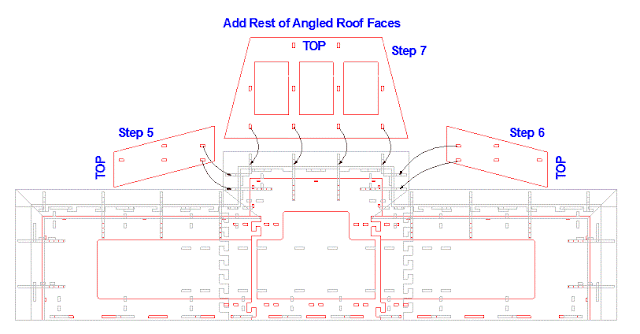
The next step is to add the roof faces.  DO NOT GLUE anything yet.  We want to be sure everything is fitting correctly first. For ease of assembly, be sure to assemble these faces in the order shown below.

Start with the side pieces.  These are easiest to align because the interlock with the back of the structure and you can be assured that it will be square.
Then add the larger front face.  Make note of the small arrow in the corner of these pieces.  That arrow should be facing OUT and UP.  These insure the faces are correctly aligned.
As you install these faces, the angled roof braces will need to shift a little left and right to get all the tabs and slots to align.
Repeat on the other side in steps 3&4 as shown above.


Now the last of the roof faces.  The 2 small side pieces take a little work to get installed.  Be patient and work them into place.
Then add the front roof face.
All of the roof faces should align well with their tabs/slots with the angled roof braces.  Once you have them all installed and aligned properly, you'll need to adjust them a little to get the corners and sides to align square and straight and close the gaps as much as you can.  

STILL DO NOT GLUE YET!


ADD THE TOP FLAT ROOF:

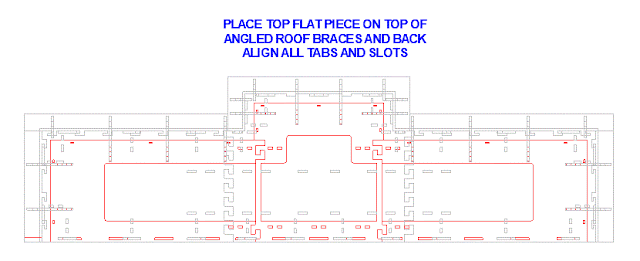
Now we add the flat roof assembly we created earlier.  Be sure to have the braces on the flat roof assembly facing DOWN/INSIDE.  This step can take a little work to get all of the tabs and slots to align properly.  Take your time and work your way around the structure.  Start on the back wall and work your way around each of the angled roof braces. You'll likely need to reach inside the structure to adjust the angled roof braces to get them to align.  But once aligned, the top flat roof should sit on top nice and snug.  Adding this flat roof assembly will also add a lot of rigidity to the structure.

Assuming everything went together as expected, you can now start adding glue to the roof system.  Feel free to add all the glue you want at this point.  Add to all connections and anywhere one part touches another on the inside.  If you choose to add glue from the exterior was wall (for example, the tabs come up through the flat roof), do so carefully since that area will be visible on the completed house.  Of course, you'll be able to sand and putty and sand and texture and paint those areas, but still.  Be careful with the glue from the exterior.


ADD THE BOTTOM BASES:


These bottom base pieces sit on top of the small lip of the floor assembly.  
DO NOT GLUE UNTIL YOU ARE SURE THEY ALL ALIGN CORRECTLTY!
Start with the largest front facing piece and be sure to shift it towards the center, against the front wall bump out.  Then add the larger side piece (on the left in the image above), shifting it forward against the first piece you added.  The backside of this base piece should be flush with the back wall.  Then add the short piece, which should be flush with the front of the front wall.


Repeat on the other side, in the same order. Assuming these all sit in where they belong, feel free to glue up well.


*** NOTE ***  Before you glue on this front base piece, make note that the door is designed to sit on top of (outside of) the base piece because the formed brick (plastic or real) adds additional thickness/depth.  If you didn't choose our formed brick options, then you'll want to adjust this base piece based on the thickness of your exterior material.  If you are using a flat exterior finish (like pressed paper or even just a texture and paint), you'll want to adjust this base piece before you glue it into place (Because the door trim will sit INSIDE the base piece).  


FINAL STEP:

Add the back door assembly we created earlier.  This is designed to slip up under the top door brackets, then slip down into the bottom door brackets.  The vertical braces help to align the door and keep it centered on the structure and helps prevent leaking light, once the Advent House is fully assembled and lit from within.


And it's Done!  The structure is assembled and ready for finishing.  At this point you'll want to add some additional glue to any joints and connections you think might need it, then you'll begin the putty/texture/paint and finish process.


Putty/Sand/Texture/Paint:

Since this is YOUR model and you can customize anyway you like, I'll provide a general overview of how to finish the exteriors of the structure.  Of course, you'll be able to modify it in anyway you like.  But for those who are trying to closely match the original Advent House, Follow along below:

Once you have everything well glued and dryed/cured, we can then start the exterior finishes.  We use the following items, available from Amazon, Walmart, about any hardware store:

  1. Wood Putty:  Sandable/paintable
  2. Grey Stone Texture: We like this one (click here) because it's already the color of concrete for the concrete bases.  At least 2 cans
  3. Dark Green Paint:  We use this one (click here) because we like the color and the coverage.  We prefer a more satin finish so the roof isn't too shiny.  At least 2 cans
  4. Black Paint: We use this one: (click here). At least 2 cans
  5. White Paint: We use this one: (click here). At least 2 cans
  6. Blue Painters Tape: (click here).  Any brand will do, this isn't for clean edges or corners, it's for mass covering.  You'll want several of rolls.  Be sure to get the wider stuff (1.88 inches or even wider)
  7. Optionally:  Instead of using a lot of blue painters tape, you can use scrap paper (or packing paper / brown craft paper) to help cover spaces.
You'll want to work in a well ventilated and heated space (to assist in the drying/curing of the paint).

  1. First, sand/putty/sand all joints and connections to the level of detail you want.  This is only required on the exterior, but putty and sand anywhere you want.  If you are going with one of our brick options, you don't need to worry about the walls because they'll be covered.  But be sure to spend time on the bases, and the roof/soffits.
  2. Once the putty is dried and sanded and clean, use tape to cover all the walls and the underside of the soffits.  
  3. ** NOTE:  The very front edge of the flat roof is going to have the fencing beams applied, so you don't want texture or paint on that front edge.  You can either try to tape it off, or, right after texture/paint, simply scrape that area before it dries.
  4. Use the texture spray on all of the uncovered areas (bases, roof faces, flat roof).  We add extra texture to the bases since we won't be adding any more color and we want to cover the brown wood color.  The roof pieces will get additional paint later, so you are only adding the texture for some texture.  Apply as much as you like.
  5. Remove tape from taped area immediately (so as not to pull off dried texture later)
  6. Allow the texture to FULLY dry.
  7. Tape off the bases, all the walls and the faces of the roof, leaving the soffits and the flat roof top uncovered.  Use the black paint to cover these areas.  Do multiple coats as needed.  Remove painters tape.  ** NOTE:  You can also paint the back and the back door at this time if you like.  Tape accordingly.  Try not to get black paint inside the structure (we'll want that white)  Allow the black paint to FULLY dry.  
  8. Tape off everything except for the roof faces.  Use the dark green paint to paint the roof faces.  Again - be sure to not get too much paint on the very front edge of the flat roof piece where the fencing will be applied later.  Remove tape and allow to FULLY dry.
  9. Last step:  You may want to make the interior as WHITE as possible (to help reflect light).  If so, you'll want to tape off the painted/finished areas as needed, then use the white paint on the interior.  This can be a bit of a challenge, so be sure to wear safety gear (especially your eyes and breathing)  This step is optional, but we find the extra light reflection is good for the overall finished look.
Couple of other notes:
You can paint the back and the back door and the bottom if you like, but it's not required.  Feel free to finish to your preferred level of finish.
You'll likely want to use the same color of green for more of the parts (windows, door, tower, atrium, etc) so plan ahead for that if ordering online.
Once the structure is fully complete (and after the exterior brick too) , you'll want to add the prefinished/painted fencing and the prepainted corbels as well.
Some people like to add little rubber/plastic feet to the bottom of their Advent House to both lift it just a little and to protect any surface it sits on.  
If you are using one of our brick options, be sure to allow PLENTY of time for the paint/texture to FULLY dry/cure before starting on the brick.  When starting on the brick, use blue painters tape to help protect the already finished areas.

And that's it!  The whole structure should be complete and after adding the brick/exterior finish, you'll be down to inserting the windows and the door into their respective holes, as well as placing the Atrium and Tower on top.  You can then use our LED lighting kit, or your own and add lighting and the house will be complete!


NEXT STEP:

After you have assembled all of the other parts of the model, you can then begin final assembly and put it all together!


Questions?  Please feel free to contact us on our website or our etsy store!