START HERE!
Always start with this link to see the Order of Operations for the Mansion Style Advent House. That is where you'll have access to links to all of the most current instructions.

Wednesday, November 13, 2019

Illustrated Build for: The Atrium

These are the illustrated instructions for assembling the new Laser Cut Atrium Kit.  This kit is cut from 1/8" Baltic Birch Plywood which makes it light weight and easy to assemble with precision tabs and slots.


These following steps show you how to assemble the new Atrium


KIT BLOCKS:


Like many other parts, the Atrium is contained in pre-cut kit blocks.  We suggest you keep the parts in their blocks until you need them.


CUT OUT PARTS:

Most of these parts should pop out of their blocks fairly easy.  However, for those that are being a little stubborn, turn the block face-down and cut as far through the tabs as possible.  Since this is plywood, there may be some places where the laser has not cut all the way through.  Take your time to finish cutting through those areas with an exacto knife.  Lastly, clean up the location of each of the tabs with the knife or light sandpaper, just to be sure the parts assemble with ease.


INITIAL PARTS LAYOUT:


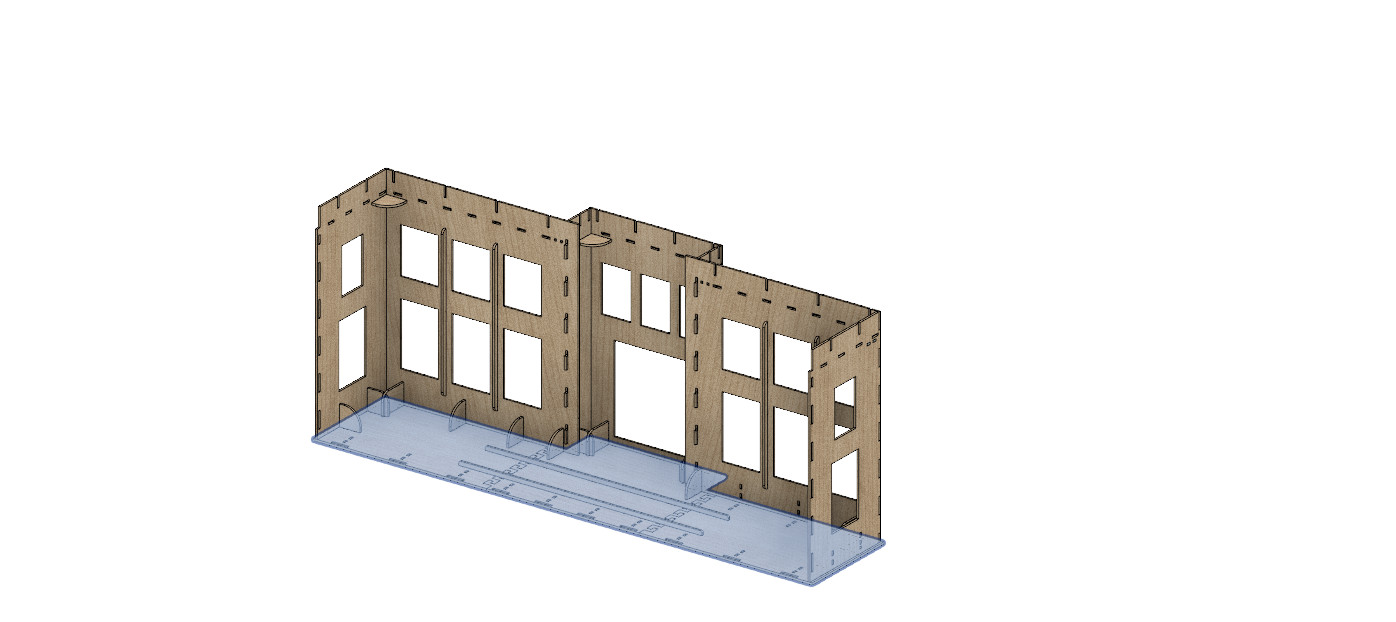
Once the parts are removed from the block, begin layout as shown above.  The 2 back parts are in the middle, the larger frame Portion (the bottom) is at the bottom of the picture, and the smaller frame part (the top) is at the top of the picture.

Begin by laying out where each of the bracing and tabs belong, as shown in the picture.  Align the different small brace tabs with their matching hole patterns.   

The cross braces down the middle of each of the larger pieces are designed to fit in only one way.  The straight pieces will be glued next to the tabbed braces to add additional gluing support.


PLACE THE BRACES:


After ensuring each of the braces are where they belong, we glue them into the back piece.  Also add the several cross braces down the middle of the top and bottom frame pieces.  Also note the 4 tiny braces (only 2 are shown in the image above) that will go on the outer most front corners of the bottom piece. These pieces will help support the side Atrium Faces.


Also, the larger center brace should be carefully glued together before gluing into its aligned slots on the bottom frame. (make sure they are perfectly aligned when you glue them together!)


TIP UP THE BOTTOM FRAME


With the braces glued in place, you can now tip up the bottom frame and slip into the aligned slots and holes.  Do this test fit before gluing.  Note the braces that push through the bottom of the bottom piece.  These longer tabs will be used to help hold the atrium in place once placed on the top of the Advent House.

Once you have test fitted the bottom piece to the back piece (the picture above has it laying on its back), you can then add glue and apply pressure for a sure gluing hold.  


TIP UP THE TOP FRAME:


In the exact same manner as we did with the bottom piece, we tip up the top piece (in the picture, the Atrium is still laying on its back).  Align the holes and slots/tabs and test fit.  Assuming it fits perfectly, feel free to glue it up.


ADD VERTICAL BRACING:


All of the vertical bracing will need to be glued in sets.  Take 2 of the braces, match them up and glue them.  Make note – you MUST have these well aligned when gluing them up in pairs!

There will be 9 total vertical braces once they are glued up.  After allowing the glue to dry/cure, you'll then want to sand the long face (where the Atrium Faces will attach).  You'll want that long face pretty flat to gain as much glueing surface as possible.  We use a tabletop belt sander and just place them on the sander for 2 or 3 seconds, just to clear away any irregular surface areas.
You can see that all of the vertical bracing is in.  Once you are sure everything fits correctly, feel free to glue.  
Once you have all the parts where they belong and it looks awesome – Go to town with the glue.  Make sure you hit all the edges and connections/seams, then allow to dry fully.


PAINT ALL THE PARTS:


The structure doesn’t require paint on the inside or the front, but I like to add some just to clean it up a little.  Be sure to give a good painting to the backside of the Atrium because it will be the most visible portion of the structure.

The Atrium Faces only need to be painted on one side.  Ensure you have them all laid out with as shown above so that you are sure to paint the correct side.  You can use double sided tape to hold these faces to the plastic on the tables.  (Spray cans can sometimes push those pieces around on the table)  Also, you’ll want to be sure you get some paint on the edges of each of the faces since some of those edges will be visible once assembled.


ADD VELLUM: (Minor Vellum Change: 2019.12.06 - Does not affect assembly)


We provide printed vellum so you can easily see where each part is to go. 
*** PLEASE NOTE: ***  Regarding gluing the Atrium Faces:  You want to be careful to keep the glue away from the open 'window' portions of the Atrium faces.  You don't want glue pushing out into those window areas.
Add a small amount of CA glue to the backs of the Atrium Faces, then place gently down on the vellum, aligning with the pre-printed marks on the vellum.
Once you place the part on the vellum – DO NOT MOVE IT – or it will leave streaks in the ‘windows’ areas. 
Be sure to have plenty of glue on the outside corners of each face, though – as this will prevent the corners from trying to lift later on.  Any glue that pushes outside of the faces isn’t a problem since we’ll be trimming off the excess vellum around the faces.


Once the glue is dried, you now trim the excess vellum away from the parts.  The easiest way we have found is to lay the part vellum-down on a hard surface (that you don’t mind having get cut).  Then use the very tip of a very sharp exacto knife and just run it around the edges.  Should clean up really nice.  Take your time to clean these up.
Make note that on the center top piece (the narrower piece with 2 holes), you need to remove the vellum from the SQUARE hole and LEAVE the vellum in the ROUNDED CORNERS hole (as seen below)


ASSEMBLE THE FACES: (Minor Change: 2019.12.06 - We now include 'Tabs' as part of the structure to assist in the assembly of the faces.)


Start with the faces on the top.  Align the 3 top faces as shown in this image and center the 3 of them together with the outside edges of the atrium structure.  The structure tabs (not shown in these images) on the backside will help align the Atrium Faces where they belong.


Once you have the 3 top parts fitting correctly (using the Structure tabs to help align), you'll then add glue to the structure and carefully place the Atrium faces onto the structure.  
Reminder:  You don't want glue pushing out into the Window areas, so make note of where you place the glue on the structure.


Moving on to the side faces, dryfit the side Atrium Face, using the top back corner tab(not shown in image above) as an aligning reference.  Then run a bead of glue up under the top face, and down both the structure, and the vertical brace, as well as on the small corner brace (not shown in image above). You may want to run 2 strips of glue up the vertical brace for the extra holding power.
Reminder:  Once you place the Atrium face, you do not want to move it!  So take your time to set it in place correctly.

Repeat this process on the other side Atrium Face, then do the 2 front large side pieces in the same manner.

Then add the two small side pieces, and finally the front piece.


COMPLETE!
And it’s complete!  The atrium is now ready for display.  You can go ahead and add extra glue from the inside if you like, just be sure to not get any glue in the open window areas!  Once you have the Tower finished it will sit inside the centered square hole on top. 


LIGHTING OPTION:


If you have purchased our lighting kit, or if you want to add LED strip lighting to your model, we have found the layout shown above works very well. 


Questions?  Please feel free to contact us on our website or our etsy store!


Sunday, November 10, 2019

Fencing Updates! With the new Laser Cut Structure

With the redesign of the structure, we've made changes to the Fencing design.  This assembly method is fast and easy - as long as you follow the directions.


The assembled and installed Fencing (unpainted and on a temporary structure)


These following steps show you how to assemble and install the fencing.


KIT BLOCKS:


The fencing comes in 3 blocks, 2 of them have the pickets, 1 of them has the 2 beam sets.


CUT OUT PARTS:

Use a sharp exacto knife to cut the tiny tabs on each of the pieces.  Be Careful!  This is Basswood (not plywood) and you don't want to break/crack the material.  Don't force the parts out of their blocks, cut the tabs until the parts drop/pop out fairly easily.
Then separate the parts out into their 3 groups (beams with no holes, beams with holes, and pickets)


Attach Beams (no holes)


You'll glue the no-hole beams to the faces of the pickets.  Ensure they are centered and aligned.  This doesn't take much glue - basswood glues pretty easily with CA Glue.


PAINT


Once the no-hole beams are glued on (and dried), put a coat of paint on BOTH SIDES of the fencing.  We use a dark green, you can use any color you like.  While painting, you will also throw a coat on ONE SIDE of the beams that have holes in them.


Prep for the Magnets

We provide a magnetic installation option.  This option protects the fencing from accidental breakage.  In the event that the fencing is bumped, or something is dropped on the Advent House while assembled and on display, the magnets will easily pop off and hopefully not break any of the pickets.

** READ through these instructions at least once, then read through again while following the directions - it is imperative that you do these next steps exactly as described below.

Start by using a sharpie (or other permanent marker) to mark either end of the magnets (doesn't matter which end).  And from now on - DO NOT remove any individual magnets from this pile/stick until told to.  It is ESSENTIAL that the magnets stay in the proper order during installation.  Otherwise, you'll get a polar opposite problem and the fencing will repel instead of staying in place.


You now take the Marked end of the magnet pile FACE TOWARDS YOU  - And KEEP IT that way.  Place the 'non-marked' end of the magnet pile into one of the holes on the assembled pickets/beams.  Then use a spare piece of wood/material (or anything non-magnetic) to push the rest of the magnets off that one, leaving it sitting nicely in it's hole.  DO NOT let the magnet turn over in its hole.  Practice this process a few times before you start with the glue because fixing it later (if installed incorrectly) is a nightmare!

Once you are sure that you have the process down - go ahead and rebuild the magnet pile, keep the marked end towards you, add a drop of glue to the holes in one of the pickets, then repeat the installation process for all the magnets.  Once you slide the rest of the magnet pile off of the magnet in the hole, you'll want to use a piece of paper towel to wipe the surface of the fencing to prevent glue build up.

Repeat this process for all of the magnets that go in the holes on the pickets.

As long as you keep the marked end of the magnet pile towards you, and you ensure the magnets don't turn over in their holes during installation, you'll then have all of the magnets installed on the fencing in the correct orientation.


ADD BEAMS TO THE STRUCTURE TOP

While the glue is drying on the magnets in the fencing pieces, you'll now attach the beams (with the holes) to the faces of the roof.


Align all of the 'hole' beams to their proper location on the roof.  You'll then run a bead of CA glue along the face of the top/flat roof.  Start with the center one, and hold in place until the glue is dry.  Make sure the front center one is centered (the 2 ends will hang over just a little)  Also, be sure to align the top of the 'hole' beam with the top of the flat roof.


MAKE NOTE - these 2 small side pieces must be pushed FORWARD, up against the front fencing beam that is already glued in place.  Pushing this piece forward allows room behind it for the long fencing pieces to fit.  Once you are sure you have it where you need it, add glue and hold until dry.

Repeat this process with the other fencing beams.  You'll then glue the long front facing beams, then the shorter side beams in place.  Be sure to push the longer side pieces forward (just like with the short side pieces).

Glue these all into place and allow to dry.


ADD MAGNETS TO THE STRUCTURE:

This next step takes practice - so before adding glue - read carefully and practice a few times.  Once comfortable with the process, and assuming it's working as expected, THEN add the glue.  Just like before, once glued - it's a nightmare to fix if wrong.

****   PLEASE NOTE ****
Once the glue is totally dry on the magnets that are glued to the fencing pickets, you must now add the rest of the magnets to the fencing pickets.  Each magnet should attract easily since all of the glued-in magnets should be orientated correctly.    *** DO NOT GLUE ** these 2nd magnets on.

So now, you'll have your fencing pickets with 2 magnets for each hole location, 1 of which that is sticking out of the back of the fencing picket.  You can see this in the image below of the fencing piece that is laying on top of the roof.


Now here is the process you'll need to follow:

First, lay the correctly sized fencing picket on top of the roof, right next to where you'll be gluing it in.  As seen below.

Then add a generous drop of glue into all of the beam holes of THAT single fencing piece  - NOT all of the holes of all of the fencing.


Now you will align the fencing magnets (the 2nd ones you added without glue) to the beam holes and press the magnets into the holes.


Then, (Quickly) while applying a little pressure into the fencing beam that is glued to the roof, slide the fencing piece to one side.  This will separate the 2 magnets and leave the 2nd magnet in the beam hole at the perfect depth.  If the magnets try to twist or turn, but it's still mostly in place, simply wipe it gently with a paper towel to make it flat.  If something goes wrong, quickly remove the magnets and wipe all surfaces with a paper towel and try again.

***  PLEASE be careful to NOT allow the fencing pickets to glue to the fencing beams.

You'll now repeat this process on each of the other fencing pieces.  Make note that the smallest fencing pieces are a bit of an extra challenge (since you can't slide them very far), so practice a few extra times there before adding glue.


And now the whole fencing system needs to be allowed to dry FULLY.  Once all of the glue is dry, you will then be able to simply touch the fencing to the roof and the magnets should stay strong enough, but be flexible enough to pop off if bumped hard.

In the unfortunate situation, if any of the magnets got flipped over during install, or installed backwards, and are now repelling instead of attracting, you'll need to take some time to dig the magnet out of the house portion (NOT the picket portion - it might break) and try to make it right.


And it's Done!  The fencing is now ready and can be stored safely too.


Questions?  Please feel free to contact us on our website or our etsy store!


Friday, September 13, 2019

New Structure Design (faster, easier, lighter)

We have recently completed a redesign of the Advent House Structure and made it even easier and faster to assemble.  We are no longer using the 1/4" MDF Materials and instead have converted to the 1/8" Baltic Birch Plywood.  Follow the steps below for easy assembly and a strong structure.


The finished structure.


These following steps show you how to assemble the new Structure.


KIT BLOCKS:


Like many other parts, the Structure is contained in pre-cut kit blocks.  We suggest you keep the parts in their blocks until you need them.


CUT OUT PARTS:

Most of these parts should pop out of their blocks fairly easy.  However, for those that are being a little stubborn, turn the block face-down and cut as far through the tabs as possible.  Since this is plywood, there may be some places where the laser has not cut all the way through.  Take your time to finish cutting through those areas with an exacto knife.  Lastly, clean up the location of each of the tabs with the knife or light sandpaper, just to be sure the parts assemble with ease.


START WITH THE FLOOR:


*** PLEASE NOTE: *** The 2 blue pieces shown in the image below are now CUT IN 2 individual pieces each instead of 1 long piece. 

Start with the middle floor piece and the 2 braces that fit the slot pattern.  Glue the Braces onto this middle floor part.  We assemble the floor 'face up' so that the braces will be 'inside' the structure.

Then add the 2 side bottom pieces.  Align the tabs/slots with the braces and the fingers on the middle piece.  Feel free to glue up.  Set aside.


ASSEMBLE THE BACK WALL:

*** PLEASE NOTE: *** The 2 blue pieces shown in the image below are now CUT IN 2 individual pieces each instead of 1 long piece.
Start with the middle top back piece and the 2 horizontal braces that line up with the slot pattern.  We'll assemble this back wall to have most of the braces on the 'inside' of the structure.  In these first images, we are looking at the inside of the back wall.  You'll note below what parts do NOT face inward.

Then add the 2 other top back pieces that align with the tabs/slots and fingers.


** NOTICE **  We have recently made some minor modifications to this back piece which modifies the next few steps.  We are working on updating the instructions.  If you have any questions, please Contact Us.

*** PLEASE NOTE: *** The 2 blue pieces shown in the image below are now CUT IN 2 individual pieces each instead of 1 long piece.
Then we take the bottom left back piece and add the 2 horizontal braces that align with the tab/slot pattern.

Then add the other side of the bottom back pieces.

Now combine the 2 back wall pieces and add the 2 shorter vertical braces, as well as the wall-to-floor braces.  All of the bracing to this point is 'Inside' the structure and will not be seen.

*** NOTE: *** Now Turn the back piece over so we are now looking at the side without any bracing.  This side is the 'Outside' of the back wall.

And add the 2 taller vertical braces, as well as the back door brackets.

Make note on the bottom braces, they need to be aligned like this.  DO NOT GLUE the bottom brackets right now.  We'll finalize these brackets later.  In the image above, the left side of the image is the 'Outside' of the back wall.


ASSEMBLE THE FLAT ROOF:


The Flat roof gets assembled upside-down, so that, when installed to the structure, the braces will all be 'inside' the structure.  This means in these pictures below, we are looking at the 'underside' of the flat roof.

Start with the middle flat roof piece and add the 2 shorter braces and the 1 longer brace that align with the tab/slots pattern.  It's wise to dryfit the parts before you start gluing.

Now add the other 2 side pieces, aligning with the tabs/slots and the fingers on the ends of the parts.

Then, when you flip it over, it looks like this.  In this image above, we are now looking at the TOP of the flat roof.  This is the orientation that we'll install it on the structure.  Set aside for now.


ADD BRACING TO THE WALLS:


These braces are used to enhance the rigidity of the structure.  You may choose to dry-fit many of these braces just to be sure they are all in the correct place.  

Add the following braces to the front center wall.  Note that the inside corner braces at the bottom have a unique slot/tab pattern to ensure they go in the correct place. We suggest dryfitting all of these braces to ensure you have them all in the correct place, then come back and glue all of them into place.

Add these braces to the larger wall, and repeat on the other large front wall as well.  Make note of the 2 vertical bracing on these larger walls.

Then add these braces to the end walls.  And repeat on the other end wall.  ** Do note that these images are showing the optional side windows cut out.  If you are building your Advent House without these optional side windows, you will NOT want to cut them out.


ASSEMBLE THE WALL SYSTEM:


Start with the front center wall.  Note that the lower braces are designed to 'interlock' to provide more strength in the structure.  These interlocking braces will take a little extra encouragement to get these 2 wall pieces to get their tabs/slots aligned.  Be careful not to break anything, though.

And we add the other side of the front wall system.


Now assemble these 2 walls.  Same as the other one, encourage the bottom interlocking braces to play nicely.

Repeat with the walls for the other side.

Now we add the side wall set to the center wall set.  In this case, slip the locking 'hooks' through the slots and slip down to create a strong and secure connection.

And we repeat on the other walls.

And we add the back wall assembly as well.  We now have a 'wall system', that will sit down on the floor assembly.

This step will take a little work.  Please note that in this image, the back wall is removed for the purpose of clarity.  In reality, you'll be adding the entire wall set to the assembled floor system.  You'll need to be patient and carefully work your way around the wall set, getting each of the tabs and slots to align and 'play nicely'.  Be patient.  Once they are all in (and set all the way in), you'll have a very strong wall system.  There should be very little light coming through between the walls and the floor. (hopefully none)  Once the walls and the floor are assembled, go to town with the glue to ensure they stay together.


ADD THE SOFFITS:


With the walls assembled and placed on the floor assembly, we can now add the soffits.  You MUST do these in the correct order and we advise you to NOT glue these until you are sure of the assembly process.

Start with the side soffit.  Slip the 'hooks' into the slots, then shift the soffit towards the back of the walls.  This will lock the soffit into place.

Then add this next soffit piece.  Assemble just like the previous soffit.  You'll note that once this one is installed, the previous one will NOT be able to be removed.

Now repeat these steps (in the correct order) for the soffits on the other side.

And finally, slide the center soffit in from the front, all the way back until the 2 small tabs on either end sit into the holes on the wall pieces.


ADD THE ANGLED ROOF BRACES:


Start with the 6 shorter angled roof braces.  Note that ALL of the roof braces angle INTO the structure so that the angled roof panels will lean IN.  DO NOT GLUE these yet.

These 6 shorter angled roof pieces go on the outside corners.

Now add the taller angled roof pieces.  These go in all the other top slots on the wall pieces.  Note that all of the angled roof braces must slip all the way down into their slots.  DO NOT GLUE these yet.

Next we start adding the angled roof panels.  Start with the far side roof (on the far left of this image).  Align all the tabs and slots and it should sit in there pretty clean.  Then add the large front facing roof panel, then the small roof panel.  Each should sit in their location with ease and be self supporting without glue yet.

DO NOT GLUE THESE YET!

Repeat on the other side.

Then add the front center roof panel.

Now we add the flat roof assembly we created earlier.  Be sure to have the braces on the flat roof assembly facing DOWN/INSIDE.  This step can take a little work to get all of the tabs and slots to align properly.  Take your time and work your way around the structure.  You'll likely need to reach inside the structure to adjust the angled roof braces to get them to align.  But once aligned, the top flat roof should sit on top nice and snug.  Adding this flat roof assembly will also add a lot of rigidity to the structure.

Assuming everything went together as expected, you can now start adding glue to the roof system.


ADD THE BOTTOM BRACES:


These bottom base pieces sit on top of the small lip of the floor assembly.  Start with the largest front facing piece and be sure to shift it to the right, against the front wall bump out.  Then add the larger side piece (on the left in the image above), shifting it forward against the first piece you added.  The backside of this base piece should be flush with the back wall.  Then add the short piece, which should be flush with the front of the front wall.

Repeat on the other side, in the same order. Assuming these all sit in where they belong, feel free to glue up well.

*** NOTE ***  Before you glue on this front base piece, you'll note there are 2 different pieces that fit here.  One of them has a wider opening for the door.  The other has a narrower opening for the door.  If you plan on using a formed exterior (such as our plasti-formed brick or our Real Clay brick), then you'll want to use the base with the narrower opening. (Because the door trim will sit OVER the base piece)  If you are using a flat exterior finish (like pressed paper or even just a texture and paint), you'll want to use the base with the wider opening (Because the door trim will sit INSIDE the base piece).  Test both pieces, with consideration of your exterior finish, before gluing this piece in place.


FINAL STEP:


Add the back door assembly we created earlier.  This is designed to slip up under the top door brackets, then slip down into the bottom door brackets.  The vertical braces help to align the door and keep it centered on the structure and helps prevent leaking light, once the Advent House is fully assembled and lit from within.


And it's Done!  The structure is complete and ready for finishing.  At this point you'll want to add some additional glue to any joints and connections you think might need it, then you'll begin the putty/texture/paint and finish process.


NEXT STEP:

Finish up the structure by adding all of the exterior finishes.  After you have assembled all of the other parts of the model, you can then begin final assembly and put it all together!


Questions?  Please feel free to contact us on our website or our etsy store!