We have recently completed a redesign of the Advent House Structure and made it even easier and faster to assemble. Follow the steps below for easy assembly and a strong structure.
The finished structure.
These following steps show you how to assemble the new Structure.
KIT BLOCKS:
CUT OUT PARTS:
Most of these parts should pop out of their blocks fairly easy. However, for those that are being a little stubborn, turn the block face-down and cut as far through the tabs as possible. Since this is plywood, there may be some places where the laser has not cut all the way through. Take your time to finish cutting through those areas with an exacto knife. Lastly, clean up the location of each of the tabs with the knife or light sandpaper, just to be sure the parts assemble with ease.
START WITH THE FLOOR:
Then add the 2 side bottom pieces. Align the tabs/slots with the braces and the fingers on the middle piece. Feel free to glue up. Set aside.
ASSEMBLE THE BACK WALL:
Then add the 2 other top back pieces that align with the tabs/slots and fingers.
Then we take the bottom left back piece and add the 4 horizontal braces that align with the tab/slot pattern.
Then add the other side of the bottom back pieces.
Now combine the 2 back wall pieces and add the 2 shorter vertical braces, as well as the wall-to-floor braces. All of the bracing to this point is 'Inside' the structure and will not be seen.
Then add the other side of the bottom back pieces.
Now combine the 2 back wall pieces and add the 2 shorter vertical braces, as well as the wall-to-floor braces. All of the bracing to this point is 'Inside' the structure and will not be seen.
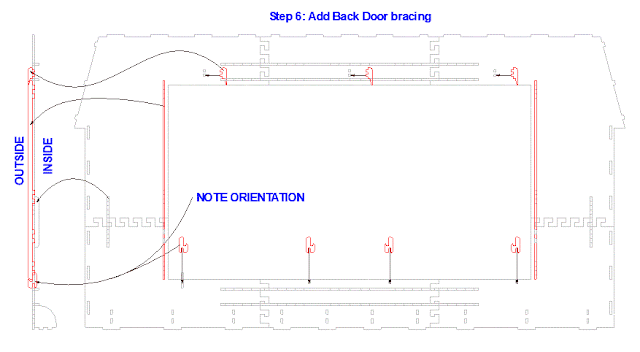
*** NOTE: *** Now Turn the back piece over so we are now looking at the side without any bracing. This side is the 'Outside' of the back wall.
And add the 2 taller vertical braces, as well as the back door brackets. *** NOTE THE ORIENTATION Before Gluing ***
*** NOTE: *** Now Turn the back piece over AGAIN so we are now looking at the INTERIOR.
Make note on the bottom braces, they need to be aligned like this. DO NOT GLUE the bottom brackets right now. We'll finalize these brackets later. These brackets go on the INSIDE of the structure.
Set Aside
ASSEMBLE THE "BACK DOOR":
The Back Door gets assembled with the handles on the outside.
Now with the back door FACE UP, we add the "Handles". These handles will be visible from the OUTSIDE (Exterior) of the door and will be used for removing the door from the structure.
The Back Door gets assembled with the handles on the outside.
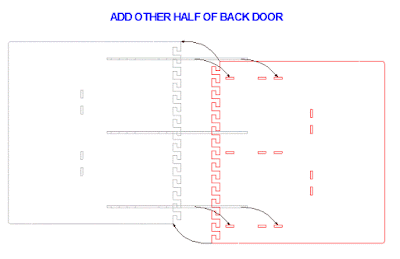
We assemble the back door 'Face Down' so that these first 3 braces are on the INSIDE of the door.
Add the other half of the back door, aligning the tabs and slots.
Now with the back door FACE UP, we add the "Handles". These handles will be visible from the OUTSIDE (Exterior) of the door and will be used for removing the door from the structure.
*** NOTE THE ORIENTATION *** Of these handles.
Set Aside
ASSEMBLE THE FLAT ROOF:
The Flat roof gets assembled upside-down, so that, when installed to the structure, the braces will all be 'inside' the structure. This means in these pictures below, we are looking at the 'underside' of the flat roof.
Start with the middle flat roof piece and add the 2 shorter braces and the 1 longer brace that align with the tab/slots pattern. It's wise to dryfit the parts before you start gluing.
Now add the other 2 side pieces, aligning with the tabs/slots and the fingers on the ends of the parts.
Set aside.
Add the following braces to the front walls. Note that the inside corner braces at the bottom have a unique slot/tab pattern to ensure they go in the correct place. We suggest dryfitting all of these braces to ensure you have them all in the correct place, then come back and glue all of them into place.
Add these braces to the larger wall and the side walls, and repeat on the other walls as well. Make note of the 2 vertical bracing on these larger walls.
Start with the middle flat roof piece and add the 2 shorter braces and the 1 longer brace that align with the tab/slots pattern. It's wise to dryfit the parts before you start gluing.
Now add the other 2 side pieces, aligning with the tabs/slots and the fingers on the ends of the parts.
ADD BRACING TO THE WALLS:
These braces are used to enhance the rigidity of the structure. You may choose to dry-fit many of these braces just to be sure they are all in the correct place.
These braces are used to enhance the rigidity of the structure. You may choose to dry-fit many of these braces just to be sure they are all in the correct place.
ASSEMBLE THE WALL SYSTEM:
Start with the front center wall. Note that the lower braces are designed to 'interlock' to provide more strength in the structure. These interlocking braces will take a little extra encouragement to get these 2 wall pieces to get their tabs/slots aligned. Be careful not to break anything, though.
And we add the other side of the front wall system then assemble these 2 walls. Same as the other one, encourage the bottom interlocking braces to play nicely.
Repeat with the walls for the other side.
Now we add the side wall set to the center wall set. In this case, slip the locking 'hooks' through the slots and slip down to create a strong and secure connection.
This is what one side will look like once connected together.
And we repeat on the other walls.
And we add the other side of the front wall system then assemble these 2 walls. Same as the other one, encourage the bottom interlocking braces to play nicely.
Repeat with the walls for the other side.
Now we add the side wall set to the center wall set. In this case, slip the locking 'hooks' through the slots and slip down to create a strong and secure connection.
And we add the back wall assembly as well. We now have a 'wall system', that will sit down on the floor assembly. (Image above is slightly exploded for clarity)
Then we add the wall set to the floor. First, make note the the floor is FACE UP, with the 4 cross braces facing up (on the inside of the structure) This next step will take a little work. You'll need to be patient and carefully work your way around the wall set, getting each of the tabs to align and 'play nicely' and sit in their correct slot. Be patient. Once they are all in (and set all the way in), you'll have a very strong wall system. There should be very little light coming through between the walls and the floor. (hopefully none) Once the walls and the floor are assembled, go to town with the glue to ensure they stay together.
ADD THE SOFFITS:
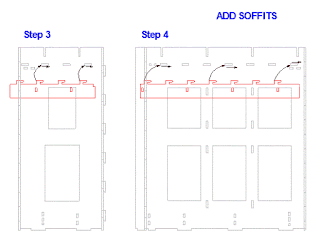
With the walls assembled and placed on the floor assembly, we can now add the soffits. You MUST do these in the correct order and we advise you to NOT glue these until you are sure of the assembly process.
With the walls assembled and placed on the floor assembly, we can now add the soffits. You MUST do these in the correct order and we advise you to NOT glue these until you are sure of the assembly process.
Start with the side soffit. Slip the 'hooks' into the slots, then shift the soffit towards the back of the walls. This will lock the soffit into place.
Then add the next soffit piece. Assemble just like the previous soffit. You'll note that once this one is installed, the previous one will NOT be able to be removed.
Now repeat these steps (in the correct order) for the soffits on the other side.
And finally, slide the center soffit in from the front, all the way back until the 2 small tabs on either end sit into the holes on the wall pieces.
Below is a summary of the steps to install the soffits. Once you understand the process and are sure everything fits as it should, feel free to add glue.
** When Gluing these, ensure they stick 'straight out' from the structure. You don't want them 'leaning' up or down.
ADD THE ANGLED ROOF BRACES:
Start with the angled roof braces on the front wall bump out. Note the shorter braces MUST go in the locations shown. DO NOT GLUE these yet.
Now add the angled roof pieces on the larger front walls. These go in all the top slots on the wall pieces. Note that all of the angled roof braces must slip all the way down into their slots. DO NOT GLUE these yet.
And now add the last few angled roof braces to the 2 side walls.
** NOTE ** All of the taller angled roof braces should be at the same height, so take a moment to ensure they are all sitting down in their slots as designed.
Each angled roof brace sits on top of (or inserts into) the soffits.
This image above shows a summary of the locations of the angled roof braces.
ADD THE ROOF FACES:
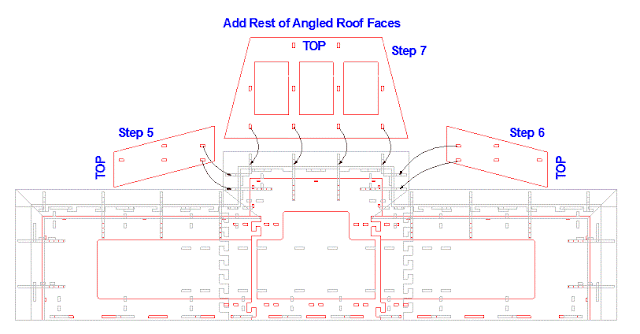
The next step is to add the roof faces. DO NOT GLUE anything yet. We want to be sure everything is fitting correctly first. For ease of assembly, be sure to assemble these faces in the order shown below.
Start with the side pieces. These are easiest to align because the interlock with the back of the structure and you can be assured that it will be square.
Then add the larger front face. Make note of the small arrow in the corner of these pieces. That arrow should be facing OUT and UP. These insure the faces are correctly aligned.
As you install these faces, the angled roof braces will need to shift a little left and right to get all the tabs and slots to align.
Repeat on the other side in steps 3&4 as shown above.
Now the last of the roof faces. The 2 small side pieces take a little work to get installed. Be patient and work them into place.
Then add the front roof face.
All of the roof faces should align well with their tabs/slots with the angled roof braces. Once you have them all installed and aligned properly, you'll need to adjust them a little to get the corners and sides to align square and straight and close the gaps as much as you can.
STILL DO NOT GLUE YET!
ADD THE TOP FLAT ROOF:
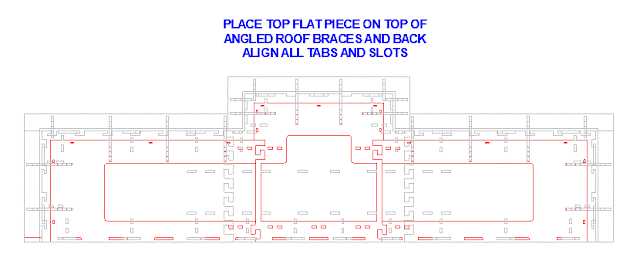
Assuming everything went together as expected, you can now start adding glue to the roof system. Feel free to add all the glue you want at this point. Add to all connections and anywhere one part touches another on the inside. If you choose to add glue from the exterior was wall (for example, the tabs come up through the flat roof), do so carefully since that area will be visible on the completed house. Of course, you'll be able to sand and putty and sand and texture and paint those areas, but still. Be careful with the glue from the exterior.
ADD THE BOTTOM BASES:
These bottom base pieces sit on top of the small lip of the floor assembly.
DO NOT GLUE UNTIL YOU ARE SURE THEY ALL ALIGN CORRECTLTY!
Start with the largest front facing piece and be sure to shift it towards the center, against the front wall bump out. Then add the larger side piece (on the left in the image above), shifting it forward against the first piece you added. The backside of this base piece should be flush with the back wall. Then add the short piece, which should be flush with the front of the front wall.
Repeat on the other side, in the same order. Assuming these all sit in where they belong, feel free to glue up well.
*** NOTE *** Before you glue on this front base piece, make note that the door is designed to sit on top of (outside of) the base piece because the formed brick (plastic or real) adds additional thickness/depth. If you didn't choose our formed brick options, then you'll want to adjust this base piece based on the thickness of your exterior material. If you are using a flat exterior finish (like pressed paper or even just a texture and paint), you'll want to adjust this base piece before you glue it into place (Because the door trim will sit INSIDE the base piece).
FINAL STEP:
Add the back door assembly we created earlier. This is designed to slip up under the top door brackets, then slip down into the bottom door brackets. The vertical braces help to align the door and keep it centered on the structure and helps prevent leaking light, once the Advent House is fully assembled and lit from within.
Since this is YOUR model and you can customize anyway you like, I'll provide a general overview of how to finish the exteriors of the structure. Of course, you'll be able to modify it in anyway you like. But for those who are trying to closely match the original Advent House, Follow along below:
Once you have everything well glued and dryed/cured, we can then start the exterior finishes. We use the following items, available from Amazon, Walmart, about any hardware store:
- Wood Putty: Sandable/paintable
- Grey Stone Texture: We like this one (click here) because it's already the color of concrete for the concrete bases. At least 2 cans
- Dark Green Paint: We use this one (click here) because we like the color and the coverage. We prefer a more satin finish so the roof isn't too shiny. At least 2 cans
- Black Paint: We use this one: (click here). At least 2 cans
- White Paint: We use this one: (click here). At least 2 cans
- Blue Painters Tape: (click here). Any brand will do, this isn't for clean edges or corners, it's for mass covering. You'll want several of rolls. Be sure to get the wider stuff (1.88 inches or even wider)
- Optionally: Instead of using a lot of blue painters tape, you can use scrap paper (or packing paper / brown craft paper) to help cover spaces.
You'll want to work in a well ventilated and heated space (to assist in the drying/curing of the paint).
- First, sand/putty/sand all joints and connections to the level of detail you want. This is only required on the exterior, but putty and sand anywhere you want. If you are going with one of our brick options, you don't need to worry about the walls because they'll be covered. But be sure to spend time on the bases, and the roof/soffits.
- Once the putty is dried and sanded and clean, use tape to cover all the walls and the underside of the soffits.
- ** NOTE: The very front edge of the flat roof is going to have the fencing beams applied, so you don't want texture or paint on that front edge. You can either try to tape it off, or, right after texture/paint, simply scrape that area before it dries.
- Use the texture spray on all of the uncovered areas (bases, roof faces, flat roof). We add extra texture to the bases since we won't be adding any more color and we want to cover the brown wood color. The roof pieces will get additional paint later, so you are only adding the texture for some texture. Apply as much as you like.
- Remove tape from taped area immediately (so as not to pull off dried texture later)
- Allow the texture to FULLY dry.
- Tape off the bases, all the walls and the faces of the roof, leaving the soffits and the flat roof top uncovered. Use the black paint to cover these areas. Do multiple coats as needed. Remove painters tape. ** NOTE: You can also paint the back and the back door at this time if you like. Tape accordingly. Try not to get black paint inside the structure (we'll want that white) Allow the black paint to FULLY dry.
- Tape off everything except for the roof faces. Use the dark green paint to paint the roof faces. Again - be sure to not get too much paint on the very front edge of the flat roof piece where the fencing will be applied later. Remove tape and allow to FULLY dry.
- Last step: You may want to make the interior as WHITE as possible (to help reflect light). If so, you'll want to tape off the painted/finished areas as needed, then use the white paint on the interior. This can be a bit of a challenge, so be sure to wear safety gear (especially your eyes and breathing) This step is optional, but we find the extra light reflection is good for the overall finished look.
Couple of other notes:
You can paint the back and the back door and the bottom if you like, but it's not required. Feel free to finish to your preferred level of finish.
You'll likely want to use the same color of green for more of the parts (windows, door, tower, atrium, etc) so plan ahead for that if ordering online.
Once the structure is fully complete (and after the exterior brick too) , you'll want to add the prefinished/painted fencing and the prepainted corbels as well.
Some people like to add little rubber/plastic feet to the bottom of their Advent House to both lift it just a little and to protect any surface it sits on.
If you are using one of our brick options, be sure to allow PLENTY of time for the paint/texture to FULLY dry/cure before starting on the brick. When starting on the brick, use blue painters tape to help protect the already finished areas.
And that's it! The whole structure should be complete and after adding the brick/exterior finish, you'll be down to inserting the windows and the door into their respective holes, as well as placing the Atrium and Tower on top. You can then use our LED lighting kit, or your own and add lighting and the house will be complete!
After you have assembled all of the other parts of the model, you can then begin final assembly and put it all together!
Questions? Please feel free to contact us on our website or our etsy store!


