The construction of each part of this Advent House requires similar tools. This list can be found here. You'll also need spray adhesive such as a general 3M spray.
-----------------------------------------------
To begin the Tower Assembly, you'll need to paint the Tower Faces. You only need to paint one side of each face, but be sure to paint the edges as well. You can easily paint the faces by hanging them from a re-bent paperclip that is hanging from a string strung across your garage (or outside if the weather is nice). Be sure to follow the instructions on the can of spray paint.
When complete, this tower can be set on the Atrium facing any of the 4 directions, but it's designed to have a wide tower face facing out. This way you are less likely to see the edges of the other faces.
-----------------------------------------------
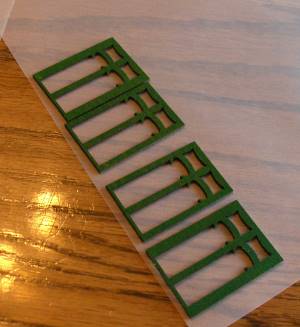
Tower Face Layout
We begin assembly by laying out the Tower Faces on a piece vellum. We'll glue the faces to the vellum, then cut away the extra vellum.
Lay out the faces, painted side up, to be sure the pieces fit nicely on the vellum.
Then, remove the faces, turn them Paint side down on a large open newspaper. Using spray adhesive, lightly coat the backs of the faces.
Then turn the faces over and lay them back on the vellum. DON'T Move them! Once they are placed, don't move them around or you'll get adhesive streaks. Use a book to ensure proper pressure and adhesion of the glue to the vellum.
-----------------------------------------------

Cut Out the Tower Faces
After the glue dries, use your very sharp exacto knife to cut away the excess vellum from around the tower faces.
-----------------------------------------------

Tower Faces cut out
This shows all 4 faces cut out of the vellum.
-----------------------------------------------

Start Structure
Next we attached the faces to the two structure pieces. Make note to use the 2 Narrow faces for this step.
Please Note! You need to align the TOP of the Face with the TOP of the frame. (fat frame side down). This leaves a small amount of frame sticking below the face. This is to help the tower stay in place on top of the atrium.
-----------------------------------------------

Other 2 Faces
Now add the two Wide faces, again - aligning the TOP of the frame with the TOP of the face.
That was easy.
-----------------------------------------------

Cuppola and Trim
Next we grab the Tower Trim and the Cuppola.
-----------------------------------------------

Tower Trim
Wrap a piece of Trim around the very base of the Cuppola. Hold the trim in that position (as shown in the image) and dip the trim into warm water.
This allows the wood fibers to bend a little and it will help the trim hold it's shape better. Hold the trim until dry. Should be just a couple of minutes.
-----------------------------------------------

Cut Trim to Fit
Now cut the trim to the correct length.
-----------------------------------------------

Glue Trim onto Cuppola
Using the Gap Filling CA Glue, glue the trim to the bottom of the cuppola.
You will want to hold this into position (especially the ends) for several minutes. The ends will tend to want to pull away if you don't hold it long enough.
-----------------------------------------------

Trim Attached (01)
This image shows the trim attached around the bottom. You can also see the connecting ends. You'll want to make note of that connection and ensure it's on the 'backside' of the tower for installation to avoid it being seen.
-----------------------------------------------

Add the Other Trim
After using the same method to help bend the trim, you can cut and apply the 4 trim pieces to the cuppola. be sure to hold them in place long enough so they won't pull away.
** Please note. You'll want to be sure to orient these 4 pieces with the other trim piece in consideration. You'll want the bottom trim to be on the 'backside' of the tower and have these 4 pieces oriented on a 45 degree angle.
Also note that you'll be drilling a hole in the top to insert the spire so no trim at the top is needed.
-----------------------------------------------

Paint the Cuppola
Once the trim is attached, you can paint.
-----------------------------------------------

Attach Cuppola to Frame
With consideration of how the tower will be sitting on the Atrium, align the Cuppola, and glue in place.
You'll note in this picture that I did not get the edges of the faces painted well.
This image also doesn't show the spire attached. You'll need to drill a hole in the top center and insert the spire.
-----------------------------------------------
And that's it! The tower is quite easy to build. Just be sure to have everything planned and be specific in the process. It will look great!
I'll be adding instructions for the Atrium here as well so watch for those to come available.
(cj)